RAV4 Hybrid Inverter Coolant Bleed Procedure: Complete Step-by-Step Guide
The Toyota RAV4 Hybrid stands out for its efficient powertrain, blending a gasoline engine with electric motors for impressive fuel economy and smooth performance. At the heart of the hybrid system lies the inverter, which converts DC power from the battery into AC to drive the electric motors. This component generates significant heat during operation, making a dedicated inverter coolant system essential for thermal management and long-term reliability.
Unlike the engine cooling loop, the inverter circuit uses an electric water pump and a separate reservoir, designed to operate quietly and efficiently. Over time, air can enter this closed-loop system during service, coolant top-offs, or minor leaks, leading to reduced cooling efficiency, unusual pump noises, or even warning lights on the dashboard.
Performing a proper bleed procedure removes trapped air bubbles, ensuring optimal coolant flow and protecting expensive hybrid components. This guide walks you through the complete process in clear detail, helping DIY enthusiasts maintain their RAV4 Hybrid with confidence.
Understanding the Inverter Cooling System
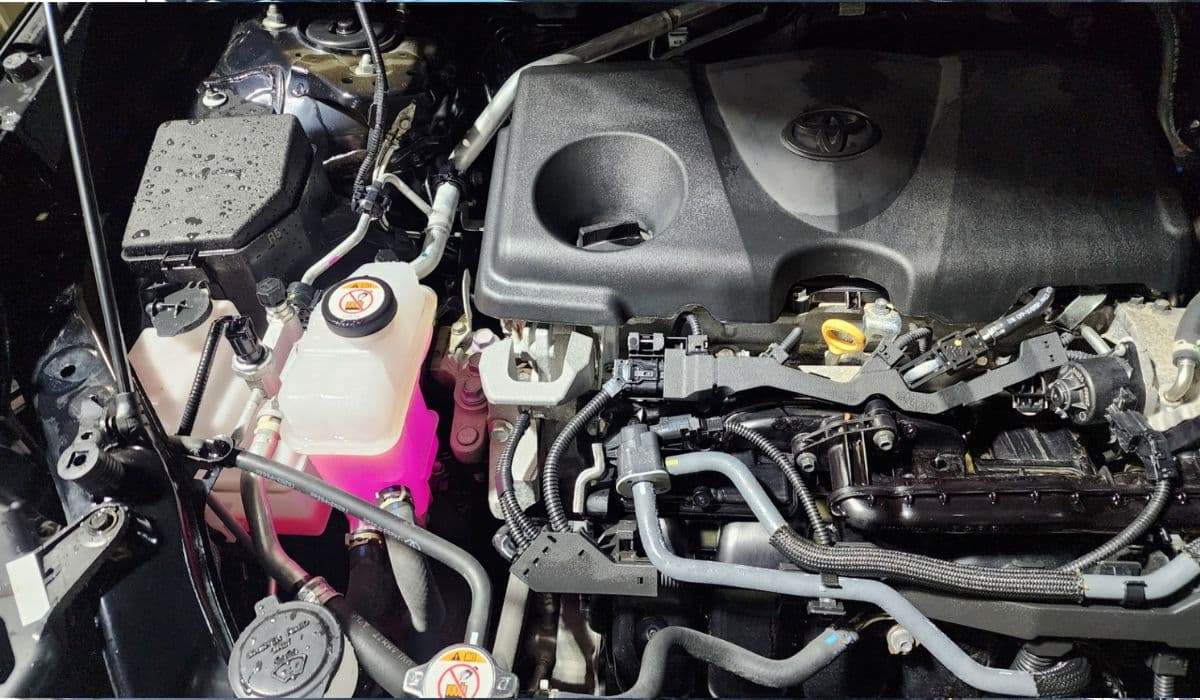
The inverter coolant loop in the RAV4 Hybrid is independent from the engine radiator system, though both typically use the same Toyota Super Long Life Coolant (pink, premixed type). Key components include:
Inverter coolant reservoir — a translucent tank usually located near the passenger side of the engine bay, marked with MIN/MAX lines.
Electric inverter water pump — circulates coolant without relying on engine operation.
Cooling passages within the inverter assembly and possibly DC-DC converter.
Hoses and lines routing coolant to heat exchangers.
Air pockets disrupt flow, causing the pump to cavitate (produce whining or gurgling sounds) and potentially overheat sensitive electronics. Bleeding restores full circulation, often signaled by quieter pump operation and stable coolant levels.
Tools and Materials Needed
Gather these items before starting for a smooth experience:
Fresh Toyota Super Long Life Coolant (or compatible pink long-life hybrid coolant).
Distilled water (if mixing concentrate, though premixed is recommended).
Funnel with a narrow spout for precise filling.
Clean rags and gloves (coolant is toxic and slippery).
Drain pan or container (at least 2-3 liters capacity).
Basic hand tools — pliers, screwdrivers, socket set (for underbody panels if accessing drain points).
Optional: clear vinyl tubing for mess-free draining.
Work on a level surface with the vehicle cooled down completely — never open hot systems to avoid burns or pressure release.
Safety Precautions Before Starting
Hybrid systems demand extra care:
Ensure the vehicle is off and the READY light is not illuminated.
Wait at least several hours after driving for full cooling.
Wear protective gloves and eyewear — coolant can irritate skin.
Keep children and pets away from the work area.
Dispose of old coolant responsibly at a recycling center.
Never mix different coolant types, as this can cause gelling and block passages.
Locating Key Components
Open the hood and identify:
The inverter coolant reservoir — smaller than the engine one, often positioned toward the firewall or passenger side.
Any accessible drain points — some models feature a petcock or drain plug on the lowest inverter line (may require removing splash shields).
The 12V battery area — some bleeding methods involve specific ignition sequences.
If your model lacks an easy drain, removal often happens via the reservoir by siphoning or careful draining.
Draining the Old Inverter Coolant
Proper draining sets the stage for effective bleeding:
Place a drain pan beneath the target area.
If equipped, open the inverter drain plug or petcock slowly to release fluid.
Alternatively, remove the reservoir cap and use a pump/siphon to extract as much old coolant as possible from the top.
Disconnect lower hoses if needed for complete emptying (advanced step — resecure tightly afterward).
Allow gravity to help drain residual fluid for 10-20 minutes.
Expect around 1-1.5 liters from a typical system. Inspect the drained fluid for contamination (milky appearance indicates issues).
Preparing for Refill and Initial Fill
With the system empty:
Reinstall any drain plugs or hoses securely.
Using a funnel, slowly pour fresh coolant into the inverter reservoir up to the MAX line.
Avoid introducing air — pour steadily without splashing.
Replace the reservoir cap loosely at first (to allow air escape during bleeding).
This initial fill provides the fluid needed for circulation.
Step-by-Step Inverter Coolant Bleed Procedure
Follow these steps carefully to purge air effectively:
Turn the ignition to ON (READY mode) without pressing the brake — this activates the electric inverter pump without starting the gasoline engine.
Listen for the pump whirring — it runs intermittently or continuously to circulate coolant.
Watch the reservoir level drop as coolant fills the system and displaces air.
After 30-60 seconds, turn ignition OFF and top off the reservoir back to MAX.
Repeat this cycle (ON for 30-60 seconds → OFF → top off) multiple times — usually 5-10 cycles.
Air bubbles may appear in the reservoir or you might hear gurgling — continue until bubbles diminish significantly.
In some cases, run in READY mode longer (several minutes) while monitoring for steady level and reduced pump noise.
Key indicator: the pump sound becomes quieter and more consistent, signaling air removal.
Top off one final time, tighten the cap securely.
For stubborn air, some technicians cycle the ignition repeatedly or use diagnostic tools to force pump activation, but the manual ON/OFF method works well for most DIYers.
Monitoring and Final Checks
After bleeding:
Start the vehicle normally and let it idle for a few minutes.
Observe the inverter reservoir — level should stabilize without rapid drops.
Check for leaks around hoses, connections, and the reservoir.
Listen for abnormal noises from the inverter area.
Drive gently for the first few trips, then recheck the level after cooling (it may settle slightly).
Top up as needed over the next 100-200 km until stable.
Consistent level and quiet operation confirm success.
Common Issues and Troubleshooting
Even with careful procedure, challenges arise:
Persistent bubbles — repeat bleed cycles or check for tiny leaks pulling in air.
Pump cavitation noise — indicates remaining air; continue cycling.
Low coolant warnings — recheck level and bleed again.
Overheating indications — stop immediately and inspect system integrity.
If issues persist, professional diagnosis with scan tools may reveal pump faults or blockages.
Why Proper Bleeding Matters for Hybrid Longevity
Mastering this procedure safeguards the inverter from thermal stress, preserving hybrid efficiency and avoiding costly repairs. Regular maintenance of both cooling systems keeps your RAV4 Hybrid running smoothly for hundreds of thousands of kilometers.
With attention to detail and patience during bleeding, you ensure peak performance from one of the most reliable hybrid platforms available.
More from Toyota
How to Fix a Toyota Sienna Sliding Door Cable Snap – Complete DIY Repair Guide
08.12.2025 13:44
Highlander Hybrid Battery Cooling Fan Cleaning: Complete Step-by-Step Guide
08.12.2025 12:56
Permanent Fix for Toyota 4Runner Liftgate Window Rattle (5th Gen 2010–2024)
08.12.2025 12:51
How to Fix Toyota Corolla Cross Wind Noise with a Simple Door Seal Modification
08.12.2025 12:47
Eliminate Turbo Lag on Toyota Tundra 2022+ with Pedal Commander – The Ultimate Throttle Response Upgrade
08.12.2025 10:47