How to Fix a Toyota Sienna Sliding Door Cable Snap – Complete DIY Repair Guide
The power sliding door cable snapping is one of the most common and frustrating failures on second-generation (2004-2010) and some third-generation (2011-2020) Toyota Sienna minivans. When the cable breaks, the door usually becomes completely inoperable — it won’t open or close manually or with the buttons, often stays stuck half-open, and triggers constant warning chimes. The dealer repair or a new door motor assembly easily costs $1,800–$2,500. The good news: you can fix it yourself in your driveway for $40–$120 and a Saturday afternoon.
Understanding Why the Sienna Sliding Door Cable Snaps
The factory cable is a thin steel wire coated in plastic that runs from the center roller hinge, through a series of pulleys, and into the power sliding door motor in the rear quarter panel. Over years of constant flexing (especially in cold weather), the plastic coating cracks, the steel strands corrode, and the cable eventually fatigues and snaps — usually right at the front ball end or inside the motor spool.
Common symptoms before total failure:
Door hesitates or jerks when opening/closing
Loud popping or clicking from the rear quarter panel
Cable visibly frayed when you remove the interior trim
Door stops halfway and beeps repeatedly
Tools and Parts You’ll Actually Need
Essential tools:
T30 Torx driver
10 mm and 12 mm sockets + ratchet
Phillips and flathead screwdrivers
Trim removal tools (plastic pry tools)
Needle-nose pliers and diagonal cutters
Small pick or awl
Zip ties and electrical tape
Shop light or headlamp
Dremel with cutoff wheel (optional but helpful)
Replacement parts (choose one option):
Option 1 – OEM-style replacement cable kit ($80–$120)
Popular kits on Amazon/eBay: “Dorman 747-411”, aftermarket kits from “A-Premium”, “YHTAUTO”, or “AutoLoc” specifically listed for 2004-2010 or 2011-2020 Sienna
Option 2 – Individual steel cable + ferrules ($40–$60)
1/8″ (3 mm) 7×19 galvanized or stainless aircraft cable
Aluminum or copper crimp ferrules (4 pcs)
Cable thimble (optional)
Option 3 – “Permanent” repair using bicycle brake cable housing and inner cable (popular forum method, ~$30)
Step-by-Step Removal of the Broken Cable
Disconnect the battery negative terminal (prevents motor from trying to move while you work).
Manually release the door: reach under the rear edge of the sliding door, pull the release lever toward the rear of the van, and push the door fully open by hand.
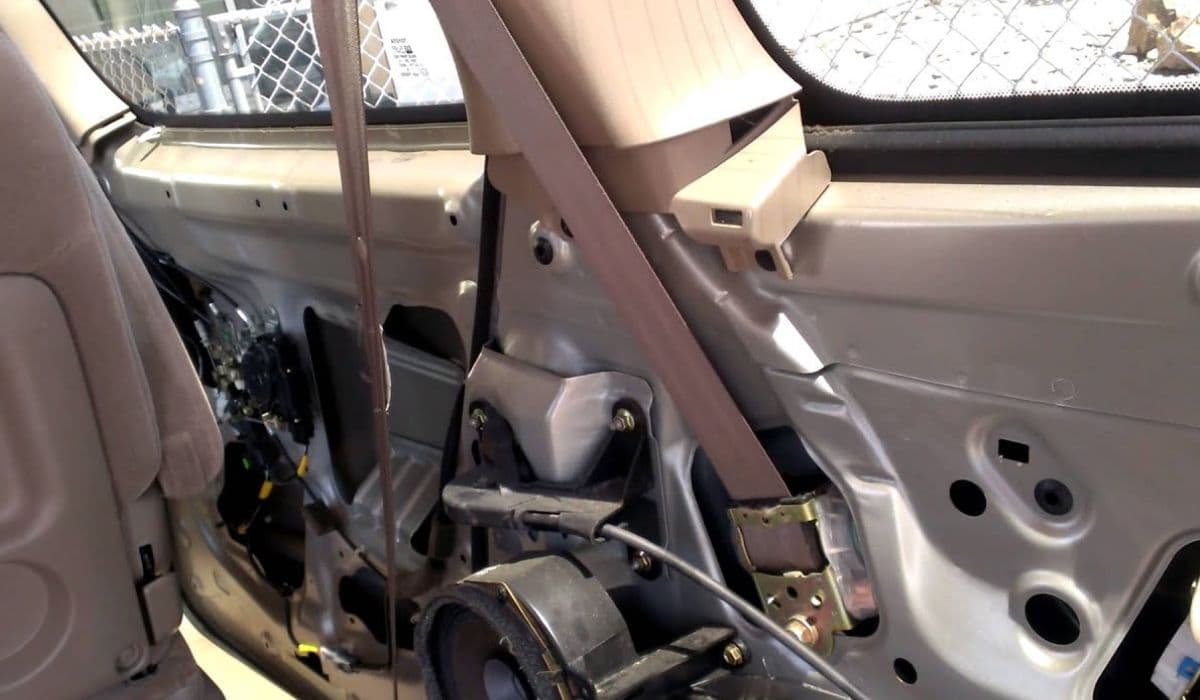
Remove the interior rear quarter trim panel (passenger side for right door, driver side for left):
Remove the seat belt bolt cover and 14 mm bolt at the bottom
Pry off the upper trim around the rear window
Remove the coat hook and courtesy light
Gently pull the entire panel outward — it’s held by push clips
Unplug the motor connector and remove three 10 mm bolts holding the motor assembly. Pull the motor out slightly.
Locate the white plastic spool inside the motor — the broken cable is usually wound around it or hanging loose.
Cut any remaining cable with diagonal cutters and remove all old pieces. Pay attention to how the cable routes through the pulleys and plastic guides.
Preparing the New Cable
If using a pre-made kit:
The cable comes pre-crimped with the correct ball ends and plastic coating. Skip to installation.
If making your own:
Cut aircraft cable 5–10 cm longer than the original
Slide a ferrule, then loop the cable through the front ball-end piece (salvaged from old cable or included in kit)
Pass the cable back through the ferrule and crimp tightly with a proper swaging tool or strong vise-grips (do four strong crimps)
Repeat for the rear end that goes into the motor spool
Wrap the crimped area with electrical tape to prevent sharp edges
Routing and bicycle cable method:
Use a derailleur or brake inner cable + outer housing to replace the entire flex section from hinge to motor
Routing and Installing the New Cable
This is the trickiest part — follow the exact original path:
Start from the center roller assembly (the hinge in the middle of the door track).
Feed the front ball end into the metal receiver on the center roller arm.
Route the cable rearward through the lower track pulley, then upward into the body.
Inside the quarter panel, route through two white plastic guides and one metal pulley.
Bring the rear end into the motor compartment and wind it clockwise onto the white spool exactly the way the old cable was (usually 4–5 turns).
Insert the rear cable end into the small hole on the spool and bend it 90° so it locks.
Tug firmly on the cable — there should be almost no slack but it must not be overtightened.
Reassembling and Testing
Reinstall the motor assembly with three 10 mm bolts
Reconnect the motor plug
Reconnect the battery
Use the power button to cycle the door fully closed, then fully open, then closed again
Check for smooth operation and listen for unusual noises
Reinstall interior trim panel in reverse order
Common Mistakes That Will Make It Fail Again in Months
Not replacing both cables (left and right doors almost always fail within months of each other)
Reusing corroded pulleys or cracked plastic guides
Crimping too weakly — the ferrule will slip under load
Overtightening the cable so it binds in cold weather
Forgetting to disconnect the battery and burning out the motor clutch
Pro Tips for a Lifetime Repair
Spray the new cable lightly with silicone or white lithium grease where it flexes
Replace the center roller hinge assembly if the plastic is cracked (common failure point, ~$60 part)
Consider installing the “updated” Toyota cable kit (P/N 69631-08030 for right, 69641-08020 for left) — Toyota redesigned the cable in later years with thicker coating
If both doors are still working, do them preventively — it’s the same labor
With good parts and careful routing, this repair lasts 8–12 years or longer. Thousands of Sienna owners have done this exact fix and saved themselves huge money.
More from Toyota
How to Change Transmission Fluid in 3rd Gen Toyota Tacoma (Sealed Transmission) – Complete DIY Guide
08.12.2025 13:59
How to Fix 4Runner KDSS Lean at Home – Complete DIY Guide
08.12.2025 14:34
Camry 2018+ 8-Speed Transmission Fluid Drain & Fill: Complete DIY Guide
08.12.2025 14:38
RAV4 2019-2024 Fuel Pump Recall DIY Check: How to Verify If Your Toyota Is Affected and What to Do Next
08.12.2025 14:41
4Runner 5th Gen Rear Differential Breather Mod: The Ultimate Guide to Preventing Water Ingestion and Extending Diff Life
08.12.2025 14:44