How to walnut blast intake valves for carbon buildup BMW
Direct injection technology in BMW engines delivers precise fuel control and impressive efficiency, but it comes with a hidden drawback: heavy carbon buildup on the intake valves. Without fuel washing over the valves as in traditional port injection systems, oil vapors from the crankcase ventilation system mix with blow-by gases and gradually harden into stubborn deposits. Over time, these layers restrict airflow, disrupt mixture formation, cause misfires, reduce throttle response, and sap power—especially noticeable in turbocharged models like those with N54, N55, B58, or even S55 engines.
Walnut blasting remains the most effective mechanical method to restore factory-like performance. Crushed walnut shells act as a gentle yet aggressive abrasive: hard enough to chip away carbon but soft enough to avoid etching aluminum ports or valve surfaces. When performed carefully, this process can dramatically improve idle quality, boost mid-range torque, and extend engine longevity.
Understanding Carbon Buildup in BMW Direct Injection Engines
Carbon accumulation stems primarily from the PCV system routing oil mist directly into the intake ports. Short trips, frequent cold starts, and stop-and-go driving accelerate the problem, while spirited highway runs help mitigate it somewhat by promoting higher operating temperatures. Symptoms often emerge gradually:
Rough or hunting idle
Hesitation during light throttle application
Reduced fuel economy
Check engine lights related to misfires or lean conditions
Loss of top-end power
Many owners notice the difference most acutely when attempting to tune the engine—gains feel muted until the valves are addressed.
Tools and Materials You Will Need
Gather high-quality equipment to ensure a clean, efficient job:
Compressed air source capable of steady 80–120 PSI
Abrasive media blaster (pressurized or siphon type works well)
Fine-grade walnut shell media (typically 18–40 mesh for optimal flow and cleaning)
Intake manifold removal tools (torx bits, sockets, extensions)
Shop vacuum with strong suction
Plastic or specialized port adapters/vacuum attachments to contain media
Picks, brushes, and plastic scrapers for pre-loosening heavy deposits
Intake or brake cleaner for final degreasing
New intake manifold gaskets (always replace)
Borescope or inspection camera for before-and-after checks
Rags, tarps, and tape to protect surrounding components
Safety gear includes eye protection, gloves, and a dust mask—walnut dust can irritate lungs and eyes.
Preparation Steps Before Starting the Job
Start with a fully cooled engine to avoid burns and warped components. Disconnect the battery negative terminal for safety. Remove engine covers, air intake ducting, and any obstructing hoses or wiring harnesses. Label connectors to prevent confusion during reassembly.
Rotate the crankshaft by hand (using a socket on the harmonic balancer bolt) to position each cylinder at top dead center (TDC) on the compression stroke. This closes both intake valves, preventing media from entering the combustion chamber. Verify valve position visually or with a long screwdriver through the spark plug hole if needed.
Cover open ports on non-working cylinders with tape or shop towels to block stray shells.
Step-by-Step Walnut Blasting Procedure
Remove the Intake Manifold Follow model-specific torque sequences in reverse to loosen bolts. Disconnect fuel lines, vacuum hoses, and sensors carefully. Lift the manifold away slowly—watch for stuck gaskets or hidden fasteners.
Initial Inspection and Pre-Cleaning Shine a light into each port and use a borescope to assess buildup severity. Apply intake cleaner or carbon solvent to soften hardened layers. Let it soak for 10–20 minutes, then gently scrape large chunks with plastic picks. Vacuum debris immediately to reduce mess.
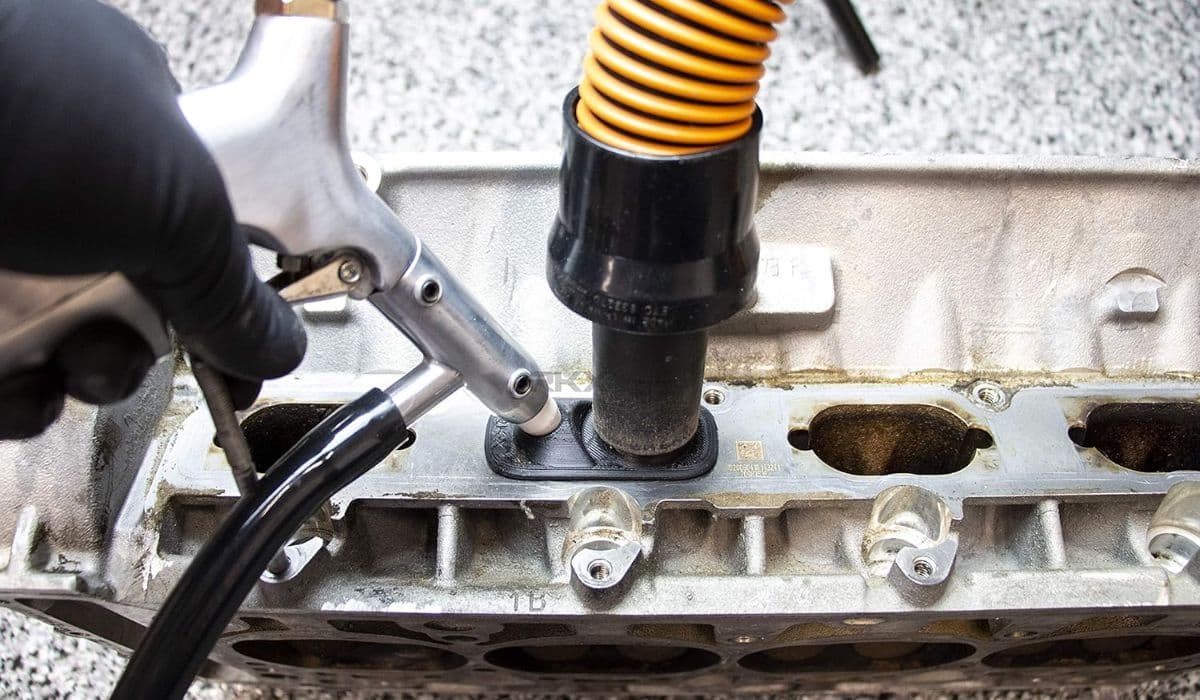
Set Up the Blasting Equipment Fill the blaster with walnut media. Attach a vacuum source to a port adapter if available—this dual-action setup (blast + suck) minimizes airborne dust and keeps shells contained. Adjust pressure to around 90 PSI for controlled aggression.
Blast Each Cylinder Methodically Work one cylinder at a time, confirming valves are closed. Insert the wand into the port and use short 4–6 second bursts while moving in circular patterns. Focus on valve tulips, stems, and port walls. Pause frequently to vacuum excess media and inspect progress. Repeat cycles (typically 3–5 passes per port) until surfaces appear metallic and clean. Avoid prolonged blasting in one spot to prevent uneven wear.
Post-Blast Cleanup Vacuum aggressively to remove all residual shells and carbon particles—any leftover media can cause serious engine damage if ingested. Wipe ports with solvent-soaked rags. Clean manifold runners and throttle body if contaminated.
Reassemble with Fresh Gaskets Install new manifold gaskets to prevent vacuum leaks. Torque bolts in the correct crisscross pattern to factory specifications. Reconnect everything in reverse order, double-checking hose routing and electrical plugs.
Tips for Achieving Professional-Level Results
Heat the engine to operating temperature before disassembly—the warmth makes carbon slightly less brittle and easier to remove.
Use finer media for final passes to polish surfaces without scratching.
Combine mechanical blasting with solvent soaks for stubborn layered deposits.
Document progress with photos through the borescope—seeing the transformation motivates careful work.
Perform the service on a clean workspace; walnut dust spreads easily and sticks to everything.
After reassembly, idle the engine briefly and listen for abnormal noises before driving.
Common Mistakes to Avoid
Skipping valve positioning risks dropping shells into cylinders—always verify TDC. Reusing old gaskets almost guarantees leaks and rough running. Rushing the vacuum step leaves debris behind, potentially scoring cylinder walls on first start. Over-pressurizing the blaster can pit aluminum—stay conservative. Ignoring throttle body or manifold cleaning allows old residue to contaminate freshly blasted ports.
Signs Your BMW Needs This Service Again
Monitor for returning symptoms around 50,000–80,000 miles after the first cleaning, depending on driving style. High-mileage turbo BMWs benefit most from periodic attention. Proactive owners who enjoy spirited driving often schedule it preventively to maintain peak responsiveness.
Restoring those intake valves through walnut blasting revives the engine’s character—smoother power delivery, crisper throttle feel, and renewed efficiency make the effort worthwhile for any enthusiast serious about long-term BMW ownership.
More from BMW
How to fix BMW coolant leaks from expansion tank (B58/N55 engines)
13.12.2025 06:48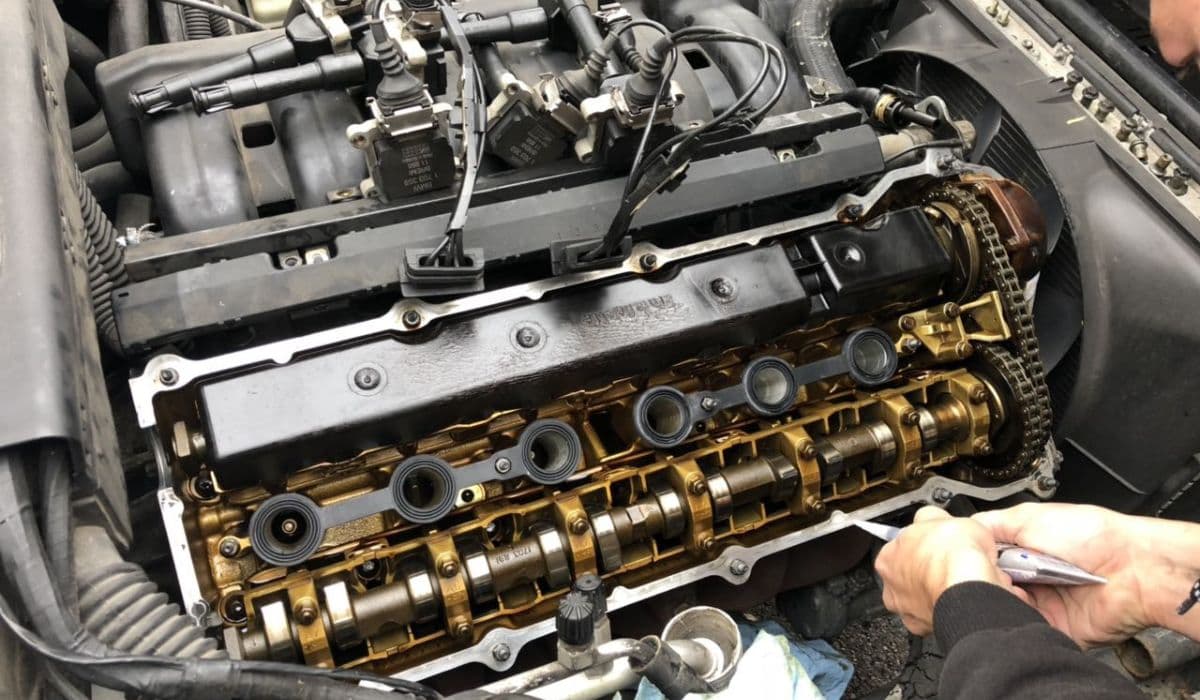
How to replace valve cover gasket oil leak BMW (common on N20/N55)
13.12.2025 05:40
How to fix VANOS solenoid rattle and codes BMW
13.12.2025 05:32
How to replace electric water pump on BMW F30/F32 models
12.12.2025 23:53