Cabin Air Filter Replacement Tips Honda CR-V
Maintaining the cabin air filter in your Honda CR-V is essential for ensuring clean, fresh air inside the vehicle while driving. This component acts as a barrier against dust, pollen, exhaust fumes, and other airborne pollutants that can infiltrate the HVAC system. Over time, a clogged filter reduces airflow, strains the blower motor, and diminishes the overall efficiency of your heating and cooling. For Honda CR-V owners, regular replacement not only enhances comfort but also contributes to better health by minimizing allergens, especially during long commutes or in urban areas with high pollution levels.
Imagine cruising down a scenic highway with the windows up, only to notice a musty odor or weaker air conditioning performance. That's often a sign the filter is overdue for a swap. Honda engineers designed the CR-V's system to be user-friendly, making this a straightforward DIY task that can save you trips to the mechanic. By keeping it fresh, you're also indirectly improving fuel efficiency, as the engine doesn't have to work harder to compensate for restricted air intake in the cabin.
Signs That Your Cabin Air Filter Needs Replacement
Recognizing when to replace the cabin air filter in your Honda CR-V can prevent minor issues from escalating. One common indicator is reduced airflow from the vents, even when the fan is on high. If you crank up the AC or heater and feel like it's barely whispering, the filter might be packed with debris.
Another telltale sign is unpleasant odors emanating from the vents, which could stem from mold or bacteria buildup on a dirty filter. During allergy season, increased sneezing or irritation inside the car points to pollen overload. Visually, if you inspect the filter and see it's darkened or covered in grime, it's time for action. Honda recommends checking every 15,000 to 30,000 miles, but factors like driving in dusty environments or heavy traffic can accelerate wear.
Pay attention to unusual noises from the blower motor, such as rattling or whining, which suggest it's overworking due to blockage. Foggy windows that take longer to clear might also indicate poor air circulation caused by a failing filter.
Tools and Materials Needed
Gathering the right tools before starting the cabin air filter replacement on your Honda CR-V ensures a smooth process. You'll need a new compatible cabin air filter, specifically designed for your model year—options include standard or activated charcoal versions for enhanced odor control.
Basic hand tools are sufficient:
A Phillips or flathead screwdriver to remove any clips or panels.
Gloves to keep your hands clean from dust.
A vacuum cleaner with a crevice tool for tidying up debris.
Optionally, a flashlight for better visibility in tight spaces.
No specialized equipment is required, making this accessible for most owners. Ensure the replacement filter matches Honda's specifications to avoid fit issues.
Step-by-Step Replacement Guide
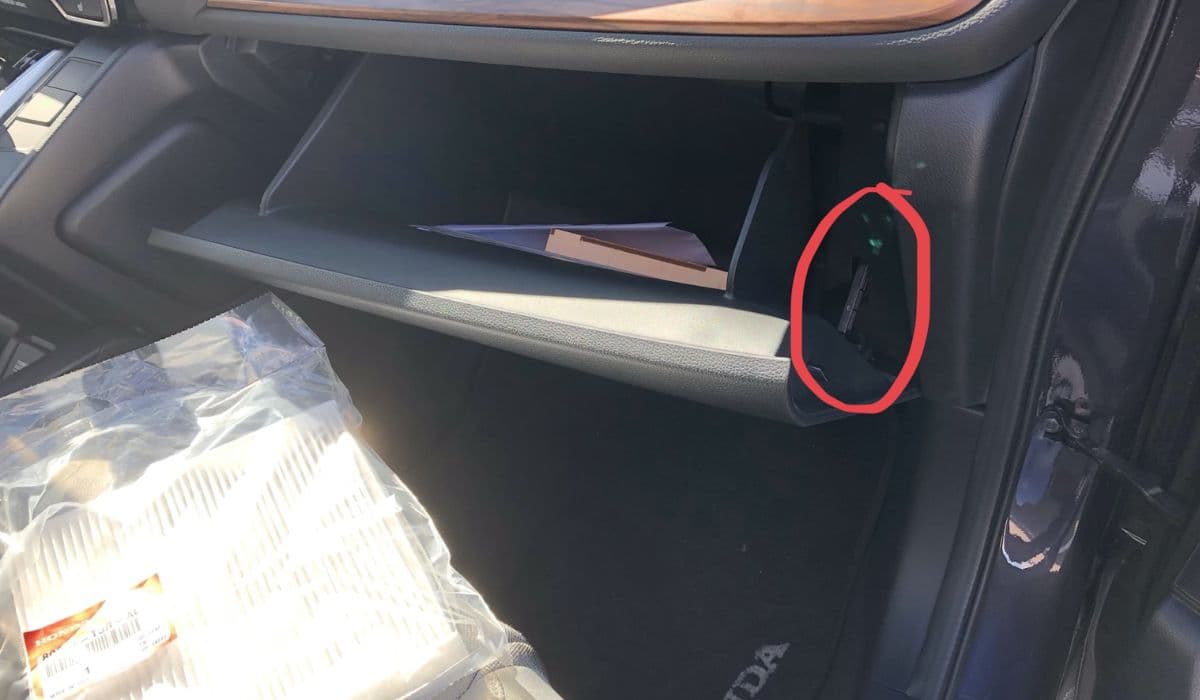
Replacing the cabin air filter in a Honda CR-V is a quick job, typically taking under 15 minutes. Start by locating the filter housing, usually behind the glove box on the passenger side. Open the glove box and press the sides inward to release the stops, allowing it to drop down fully.
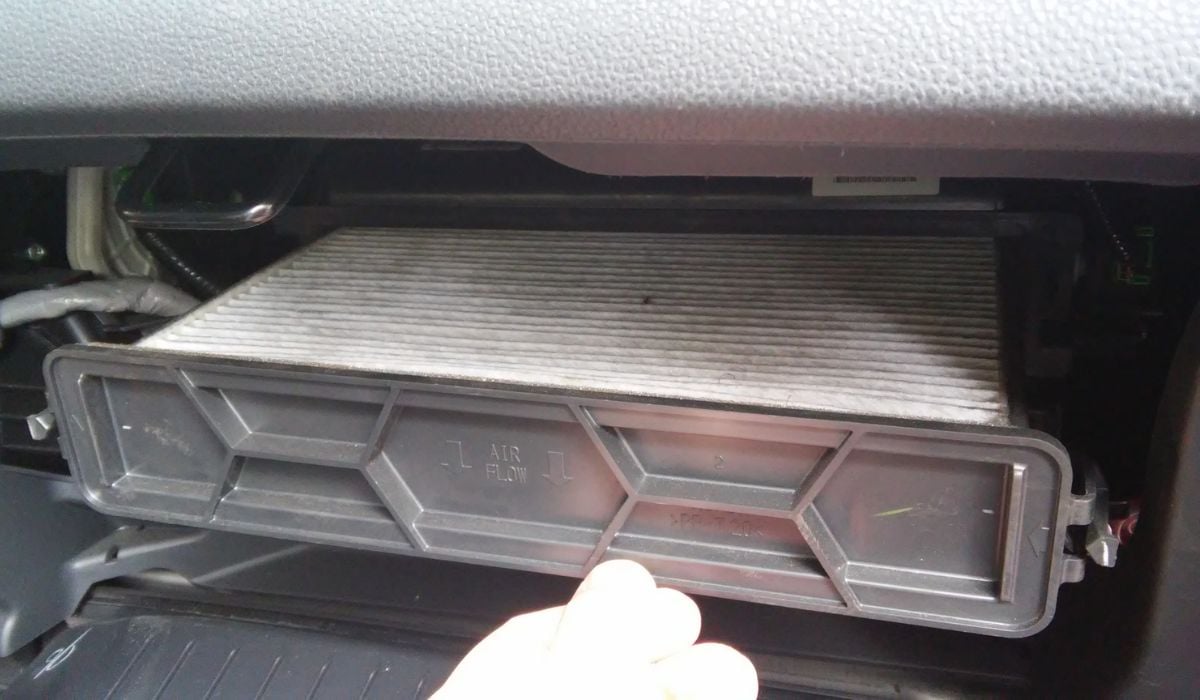
Next, remove the cover or tray holding the old filter. In many CR-V models, this involves squeezing tabs or unscrewing fasteners. Gently pull out the old filter, noting its orientation—arrows on the frame indicate airflow direction.
Before inserting the new one:
Vacuum any loose dirt from the housing to prevent contamination.
Compare the new filter to the old for size and fit.
Slide the new filter in, ensuring it's seated properly with the arrows pointing toward the blower.
Reassemble by securing the cover and repositioning the glove box. Test the HVAC system afterward to confirm improved airflow. For older CR-V generations, the access might vary slightly, such as under the dashboard, so consult your owner's manual for model-specific nuances.
Common Mistakes to Avoid
Even seasoned DIYers can slip up during cabin air filter replacement on a Honda CR-V. One frequent error is forcing the filter into place without aligning it correctly, which can damage the housing or reduce effectiveness.
Another pitfall is neglecting to clean the surrounding area, leading to immediate re-clogging. Always wear gloves to avoid transferring oils from your skin onto the filter media, which could impair its function.
Don't overlook the filter's type—using a non-OEM equivalent might seem fine initially but could lack the precise fit or filtration quality Honda intends. Rushing the reassembly might leave clips unsecured, causing rattles later.
Finally, ignoring seasonal checks in regions with high pollen or dust can shorten the filter's lifespan dramatically.
Maintenance Tips for Longevity
To maximize the life of your Honda CR-V's cabin air filter, adopt proactive habits. Park in shaded or covered areas to minimize exposure to environmental contaminants that accelerate clogging.
Regularly inspect the filter during oil changes or tire rotations for early signs of wear. In humid climates, run the AC periodically to prevent moisture buildup and mold.
Consider these practices:
Use recirculate mode in heavy traffic to limit intake of external pollutants.
Avoid smoking inside the vehicle, as residue clings to the filter.
During wildfire seasons or construction zones, check more frequently.
By integrating these into your routine, you'll enjoy consistently clean air and a more reliable HVAC system.
More from Honda

How to Fix 11th Generation Honda Civic Screen Delamination (2022–2024 Models)
08.12.2025 12:32
How to Disable Honda Walk Away Auto Lock Forever
08.12.2025 12:44
Honda CR-V: Rear Differential Fluid Change for AWD Models
24.12.2025 06:39
Honda Civic Low Beam Headlight Bulb Replacement Trick That Saves Hours and Broken Clips
08.12.2025 09:38
How to Clean the Honda Accord Hybrid Battery Fan Yourself – Full DIY Guide
08.12.2025 08:55