Honda Civic Low Beam Headlight Bulb Replacement Trick That Saves Hours and Broken Clips
Replacing a low beam headlight bulb on most Honda Civic models (especially 8th, 9th, 10th, and 11th generations) is infamous for being one of the most frustrating jobs on an otherwise reliable car. Honda decided to hide the driver-side bulb behind the fuse box and air intake, while the passenger side often requires removing the coolant reservoir or wrestling with tight plastic shields. The official method demands removing the entire front bumper or at least half of the inner fender liner on many models. The good news? There is a proven “trick” that lets you change the low beam bulb in under 10 minutes per side with zero removed parts and zero broken clips.
Why the Factory Method Is a Nightmare
Honda’s service manual tells you to:
Remove the front bumper cover (12–20 clips and bolts)
Or partially pull the wheel well liner and reach blindly
Or remove the battery and fuse box on the driver side
All these methods work, but they turn a 5-minute bulb swap into a 2-hour ordeal, risk cracking brittle plastic clips, and usually end with scraped knuckles. The trick described below works on Civic models from 2006 onward (8th–11th gen, including Si, Type R, Hybrid, and sedan/hatchback/coupe variants) and requires only basic tools most owners already have.
Tools You Actually Need
New 9006 (HB4) low beam bulb – always choose reputable brands (Philips X-tremeVision, Osram Night Breaker, Sylvania SilverStar Ultra, or OEM Honda/Stanley)
Clean microfiber gloves or plastic glove (to avoid oil from fingers on the glass)
8 mm and 10 mm short socket or stubby wrench
Long needle-nose pliers (10–12 inch recommended)
Flexible magnetic pickup tool (optional but extremely helpful)
Small flathead screwdriver or plastic trim tool
Flashlight or headlamp
The Real Trick – Driver Side (The Hard One)
Forget removing the battery or bumper. The secret is using the gap between the headlight housing and the radiator support.
Open the hood and look straight down behind the headlight on the driver side.
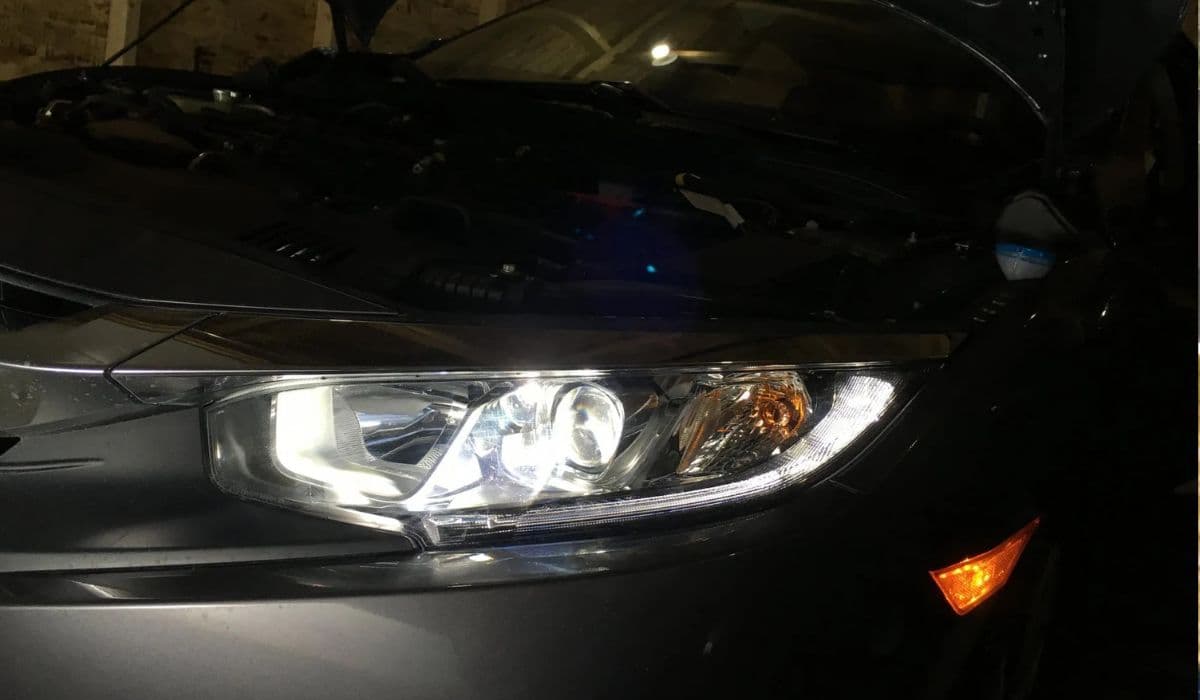
You will see the black plastic dust cap covering the low beam bulb. It sits almost vertically.
Reach down with your left hand (or right hand from the side) between the fuse box and the headlight. There is exactly enough space for an adult hand if you come from the inboard side of the headlight.
Rotate the dust cap counterclockwise about 1/8 turn and pull it straight up and out. It will feel tight – that’s normal.
Once the cap is off, you’ll see the bulb holder with the wiring harness plugged in.
Press the small metal clip that secures the connector and pull the plug straight off (do NOT pull on the wires).
The bulb is held by a thin wire retaining clip. Use long needle-nose pliers to push the top of the wire clip inward (toward the center of the car) and then swing it downward. The clip pivots on the bottom hook.
The old bulb will now drop down slightly. Grab it with your fingers or magnetic tool and pull straight out.
Insert the new 9006 bulb (tabs at 9 o’clock and 3 o’clock position) and make sure it seats fully.
Swing the wire retaining clip back up and lock it. You’ll hear a click.
Plug the connector back in until it clicks.
Test the light before reinstalling the dust cap.
Push the rubber dust cap back on and rotate clockwise to lock.
Total time: 6–9 minutes once you’ve done it once.
Passenger Side Trick – Even Easier
The passenger side is blocked by the windshield washer reservoir or coolant overflow tank on most Civics.
Locate the large round dust cap on the inboard side of the headlight.
Instead of fighting the reservoir, reach from underneath the car or from the top gap between the battery tray and headlight.
The same 1/8-turn counterclockwise removes the cap.
On most 10th and 11th-gen Civics you can actually see and reach the bulb retainer directly with your hand.
Release the connector, swing the wire clip down, swap the bulb, and reassemble.
Many owners report the passenger side can be done in under 4 minutes using this access point.
Common Mistakes That Break Things
Touching the glass of the new bulb with bare fingers – oil drastically shortens halogen life
Forcing the wire retaining clip – it only moves a few millimeters inward before swinging down
Not fully seating the new bulb – the tabs must align perfectly or the bulb will sit crooked and melt the housing
Reinstalling the dust cap crooked – water will enter and destroy the headlight in weeks
Pro Tips for Stubborn Civics
If your hands are large, use a 10-inch flexible extension with a 1/4" ratchet and a magnet on the end to retrieve a dropped bulb
Spray a tiny amount of silicone lubricant on the dust cap O-ring if it keeps popping off
On 11th-gen Civics (2022+) the dust cap is larger and has two locking tabs – press both while turning
Always replace both sides at the same time – color temperature difference is very noticeable
Upgrade to LED? Only use plug-and-play kits with external drivers and proper beam pattern (Morimoto 2Stroke 3.0, Diode Dynamics SL1, etc.) – cheap Amazon LEDs will blind everyone and fail quickly
How to Test Before You Button Everything Up
Turn the ignition to ON (engine off) and switch the headlights on. If the new bulb doesn’t light:
Check that the connector is fully seated
Verify the wire clip is fully locked
Make sure the bulb tabs are correctly oriented
Why This Trick Works When Others Fail
The space between the headlight and the core support was intentionally left for assembly line robots. Honda never expected humans to use it, but it’s the only sane way to replace the bulb without major disassembly. Thousands of Civic owners on forums like CivicX, 8thCivic, and 9thGenCivic have used this exact method for years with 100% success.
You now have the real insider trick that dealership technicians use when they don’t want to spend an hour removing the bumper for a simple bulb.
More from Honda
10th Gen Honda Civic AC Compressor Clutch Replacement – Complete DIY Guide
08.12.2025 12:12
How to Permanently Fix 2008-2017 Honda Odyssey Sliding Door Cable Snap (Complete DIY Repair Guide)
08.12.2025 12:18
How to Fix 11th Generation Honda Civic Screen Delamination (2022–2024 Models)
08.12.2025 12:32
Honda CR-V Vibration at Idle: Why Engine Mount Replacement Is Often the Real Fix
08.12.2025 09:22
Honda Pilot 9-Speed ZF Transmission Fluid Change DIY: Complete Step-by-Step Guide
08.12.2025 09:15