Honda CR-V: Rear Differential Fluid Change for AWD Models

The Honda CR-V has long been a favorite among drivers seeking reliability and versatility, especially in its all-wheel-drive (AWD) configuration. At the heart of this system's performance lies the rear differential, a crucial component that distributes power to the rear wheels dynamically. Unlike front-wheel-drive models, AWD variants rely on this unit to enhance traction on slippery roads or during off-road excursions. Over time, the fluid inside the rear differential degrades due to heat, friction, and contaminants, which can lead to reduced efficiency or even mechanical failure.
Maintaining this fluid isn't just about following a schedule; it's about preserving the vehicle's handling and longevity. In AWD models, the rear differential works in tandem with the front axle, using a viscous coupling or electronic controls to engage when needed. Fresh fluid ensures smooth operation, minimizing wear on gears and bearings. Ignoring it might result in unusual noises or vibrations, signaling deeper issues that could compromise safety.
Why Regular Fluid Changes Matter for Performance and Durability
Changing the rear differential fluid is more than routine upkeep—it's an investment in your CR-V's overall health. As miles accumulate, the fluid breaks down, losing its lubricating properties and allowing metal particles to build up. This contamination can cause overheating, which in turn accelerates component wear. For AWD enthusiasts who tackle diverse terrains, from snowy highways to gravel paths, optimal fluid condition translates to better torque distribution and stability.
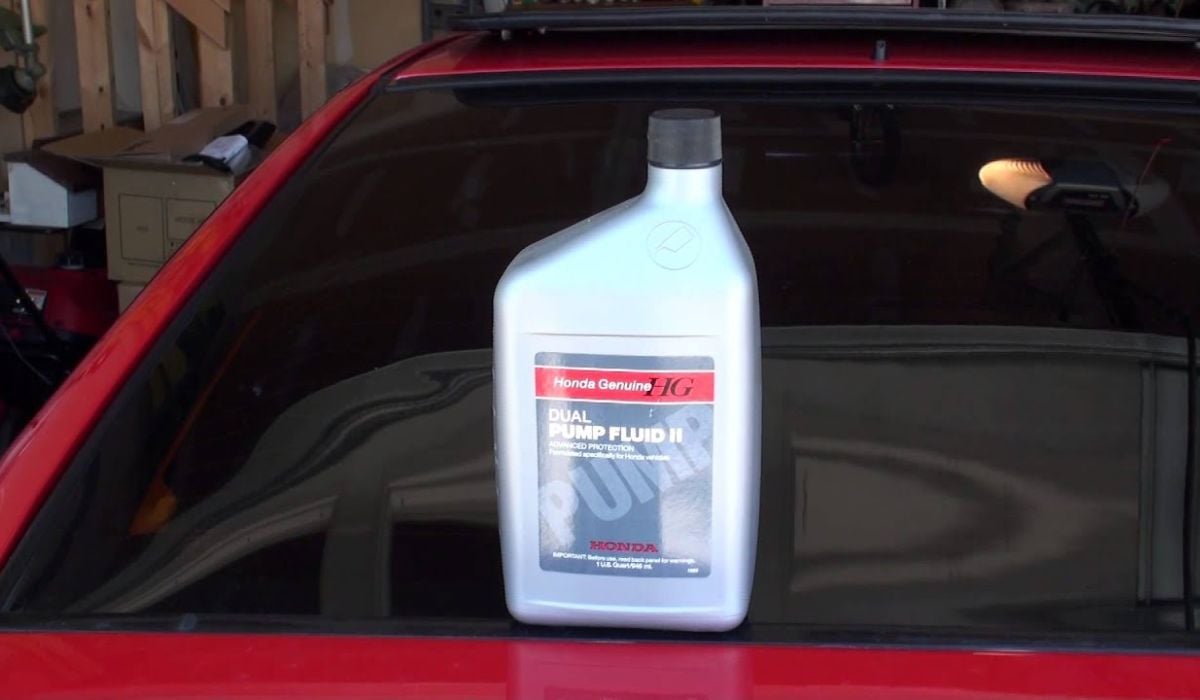
Consider the engineering behind Honda's Dual Pump Fluid II system in many CR-V generations: it uses hydraulic pumps to transfer power seamlessly. Degraded fluid hampers this process, potentially leading to sluggish response or uneven power delivery. By performing changes at recommended intervals—typically every 30,000 to 60,000 miles, depending on driving conditions—you prevent costly repairs and maintain that signature Honda smoothness.
Recognizing Signs That It's Time for a Fluid Change
Spotting early warning signs can save you from bigger headaches down the road. Listen for a whining or humming noise from the rear during turns, which often indicates insufficient lubrication. Vibrations felt through the floorboard, especially at higher speeds, might point to fluid that's too thick or contaminated.
Other indicators include:
A noticeable decrease in fuel efficiency, as the system works harder to compensate.
Difficulty in handling on wet or loose surfaces, where AWD should shine.
Dark, gritty fluid visible during a quick check—healthy fluid is usually clear or slightly amber.
If you notice any of these, it's wise to inspect sooner rather than later. Proactive monitoring keeps your CR-V performing like new, ensuring every drive feels confident and controlled.
Essential Tools and Materials for the Job
Before diving in, gather the right gear to make the process efficient and mess-free. You'll need a set of wrenches or sockets to access the fill and drain plugs, typically 3/8-inch drive for most models. A fluid pump or turkey baster helps with refilling, while a drain pan catches the old fluid.
Key items include:
Honda-specific Dual Pump Fluid II or an equivalent meeting manufacturer specs—avoid generics that might not match viscosity.
Crush washers for the plugs to ensure a proper seal.
Torque wrench for precise tightening, preventing leaks or stripped threads.
Gloves, rags, and a flashlight for visibility under the vehicle.
Having these on hand streamlines the task, turning what could be a chore into a satisfying DIY project.
Step-by-Step Guide to Changing the Rear Differential Fluid
Start by parking on a level surface and engaging the parking brake for safety. Lift the rear of the vehicle using jack stands, never relying solely on a jack. Locate the rear differential—it's the bulbous housing between the rear wheels.
Begin with draining:
Remove the fill plug first to vent the system and confirm you can refill later.
Then, loosen the drain plug, allowing old fluid to flow into the pan—expect about a quart to emerge.
Inspect the drained fluid for metal shavings or burnt smell, clues to internal wear.
Clean the plugs and magnetic tips if present, then install new crush washers. Tighten the drain plug to spec, usually around 35 ft-lbs.
For refilling:
Use the pump to add fresh fluid through the fill hole until it starts to dribble out.
Replace the fill plug and torque it similarly.
Lower the vehicle and test drive to circulate the fluid, checking for leaks afterward.
This procedure, done carefully, restores the differential's efficiency, often improving ride quality noticeably.
Common Mistakes to Avoid During the Process
Even seasoned DIYers can slip up, so awareness is key. One frequent error is over-tightening plugs, which strips threads and leads to persistent leaks. Always use a torque wrench for accuracy.
Other pitfalls:
Skipping the fill plug removal first—getting stuck without a way to add new fluid is frustrating.
Using incompatible fluid, which can cause foaming or inadequate protection.
Neglecting to clean the area, allowing dirt to enter and contaminate the fresh fill.
By sidestepping these, you ensure a smooth operation that extends the life of your AWD system.
Tips for Long-Term Maintenance and Optimization
To keep your CR-V's rear differential in top shape, integrate checks into your routine. After changes, monitor for leaks during the first few drives. In harsh climates, consider more frequent intervals to combat extreme temperatures.
Enhance longevity with:
Regular tire rotations to even out wear, reducing strain on the differential.
Avoiding aggressive off-roading without proper preparation.
Pairing fluid changes with other services like transmission flushes for comprehensive care.
These habits not only preserve performance but also amplify the joy of owning a capable AWD vehicle like the CR-V.
The process empowers owners to connect deeper with their machine, turning maintenance into an engaging aspect of ownership. Whether cruising city streets or exploring backroads, a well-maintained differential ensures reliability every mile.
More from Honda

How to Fix 11th Generation Honda Civic Screen Delamination (2022–2024 Models)
08.12.2025 12:32
How to Disable Honda Walk Away Auto Lock Forever
08.12.2025 12:44
Honda Civic Low Beam Headlight Bulb Replacement Trick That Saves Hours and Broken Clips
08.12.2025 09:38
Honda CR-V Vibration at Idle: Why Engine Mount Replacement Is Often the Real Fix
08.12.2025 09:22
How to Clean the Honda Accord Hybrid Battery Fan Yourself – Full DIY Guide
08.12.2025 08:55