PCV Valve Replacement Tips Honda V6 Engines
The Positive Crankcase Ventilation (PCV) valve plays a crucial role in maintaining the health of your Honda V6 engine. This small yet vital component helps regulate the flow of gases from the crankcase back into the intake manifold, preventing harmful buildup that could lead to engine inefficiency or damage. In Honda's V6 lineup, such as those found in models like the Accord, Odyssey, or Pilot, the PCV system is engineered for optimal performance, blending reliability with emissions control.
What makes the PCV valve fascinating is its one-way design. It allows blow-by gases—mixtures of air, fuel, and oil vapors—to escape the crankcase without letting contaminants re-enter. Over time, however, carbon deposits and sludge can clog it, disrupting this balance. For Honda V6 owners, recognizing how this valve integrates with the engine's variable valve timing (VTEC) system adds another layer of appreciation. It ensures smoother operation at high RPMs while keeping emissions low, a hallmark of Honda's engineering prowess.
Signs of a Faulty PCV Valve
Ignoring a failing PCV valve can escalate minor issues into major repairs, so staying alert to symptoms is key. Honda V6 engines often exhibit subtle warnings before full failure.
Rough idling or stalling: A clogged valve disrupts air-fuel mixture, causing vibrations or unexpected shutdowns, especially noticeable during cold starts.
Increased oil consumption: Without proper ventilation, pressure builds, forcing oil past seals and into the combustion chamber, leading to blue smoke from the exhaust.
Check engine light activation: Modern Honda systems trigger codes like P0171 or P0300, indicating lean mixtures or misfires tied to PCV issues.
Sludge buildup: Inspect the valve cover for thick residues; this signals poor crankcase evacuation, common in high-mileage V6s.
Whistling or hissing noises: Vacuum leaks from a stuck valve create audible sounds under the hood, hinting at immediate attention needed.
These signs not only affect driveability but can also reduce fuel efficiency by up to 10-15%, turning a smooth Honda ride into a frustrating experience.
Essential Tools and Materials for the Job
Preparing the right toolkit turns a potentially messy task into a straightforward DIY project. For Honda V6 engines, focus on items that ensure precision without overcomplicating things.
Socket set with extensions: A 10mm or 12mm socket is often required to access the valve, hidden near the intake manifold.
Pliers or hose clamp tool: Gentle removal of vacuum hoses prevents damage to brittle lines in older models.
Shop rags and degreaser: Clean up oil spills and residue to avoid contaminating other components.
Replacement PCV valve: Opt for OEM or high-quality aftermarket equivalents specific to your V6 variant, like those for J-series engines.
Flashlight or work light: Illuminates tight spaces under the hood, especially in compact engine bays.
Having these on hand minimizes downtime and boosts confidence, transforming you from novice to capable mechanic.
Step-by-Step Guide to Replacing the PCV Valve
Replacing the PCV valve on a Honda V6 is a rewarding task that typically takes 30-60 minutes, depending on your experience. Always work on a cool engine to avoid burns, and disconnect the battery for safety.
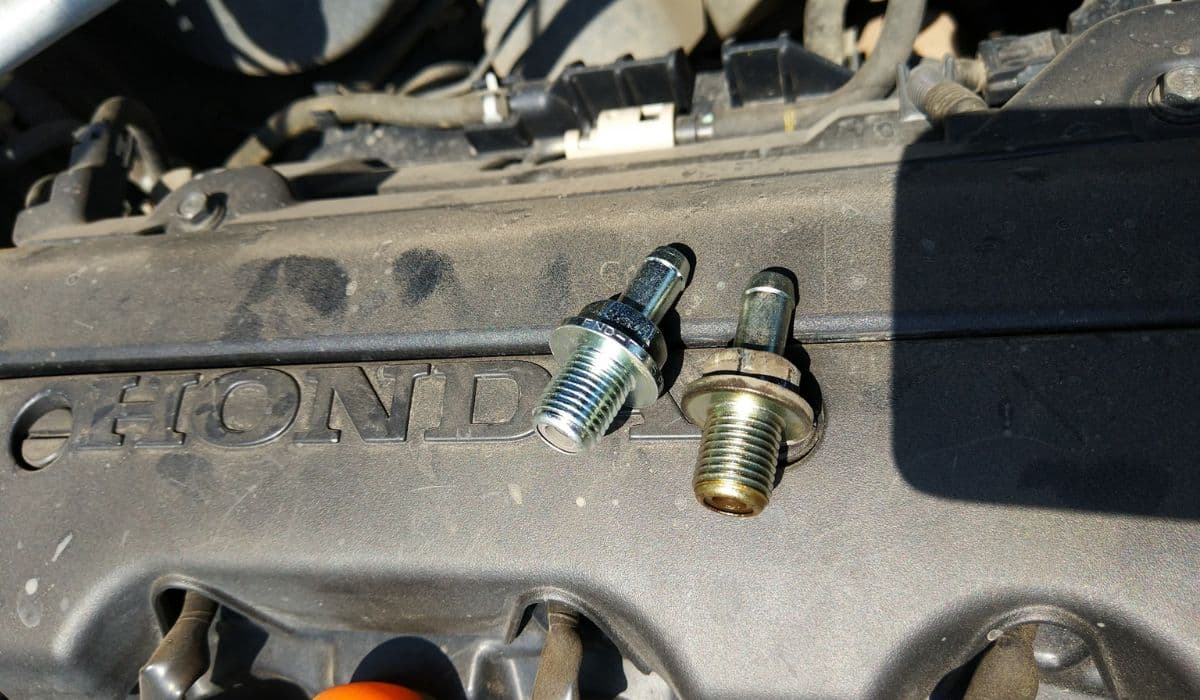
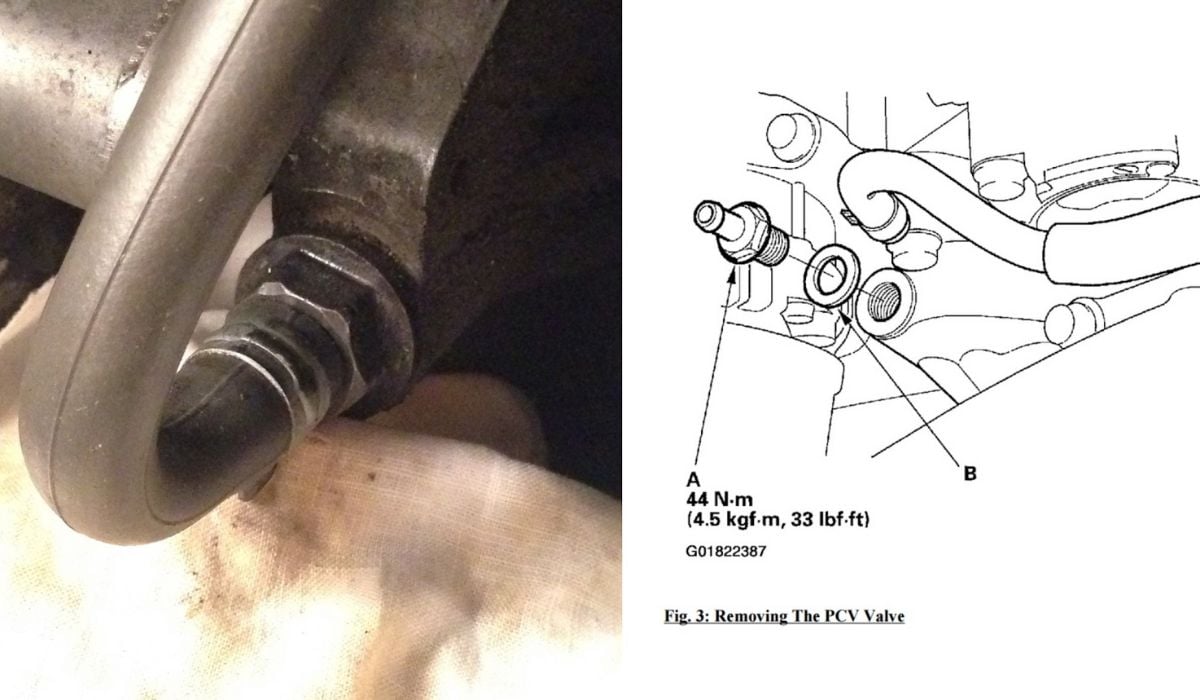
First, locate the valve—usually on the rear valve cover for most V6 setups. Pop the hood and trace the vacuum hose from the intake manifold to spot it. Gently disconnect the hose using pliers, wiggling it free without forcing to prevent cracks.
Next, remove the old valve. It might be threaded or clipped in; use the appropriate socket to loosen and extract it. Inspect for clogs—shake it; a healthy valve rattles, while a faulty one stays silent.
Install the new valve by inserting it firmly into place and securing it. Reattach the vacuum hose, ensuring a snug fit to prevent leaks. Start the engine and listen for abnormalities; rev it gently to confirm smooth operation.
For added thoroughness, check surrounding hoses for wear. In Honda V6s, these can harden over time, so replacing them simultaneously prevents future issues. This process not only restores performance but also extends engine life by maintaining proper pressure balance.
Common Mistakes to Avoid During Replacement
Even seasoned DIYers slip up, but awareness turns pitfalls into preventable errors. Honda V6 engines are forgiving, yet small oversights can lead to bigger headaches.
Over-tightening the valve: This strips threads or cracks the housing, causing leaks; hand-tighten and use a wrench sparingly.
Ignoring vacuum line condition: Brittle hoses might snap during removal, leading to air leaks and erratic idling—inspect and replace as needed.
Skipping the rattle test: Not verifying the new valve's function before installation risks installing a defective part.
Working on a hot engine: Heat softens plastics, increasing breakage risk; always allow cooling time.
Neglecting to reset codes: If the check engine light was on, use an OBD-II scanner to clear it post-replacement for accurate monitoring.
Avoiding these keeps your project efficient and your Honda running like new.
Advanced Tips for Optimal PCV System Performance
Beyond basic replacement, optimizing your Honda V6's PCV system involves proactive habits that enhance longevity. Regular oil changes with synthetic blends reduce sludge formation, keeping the valve cleaner longer.
Consider integrating a catch can in modified setups—it traps oil vapors before they reach the valve, ideal for tuned V6s pushing higher boost. Monitor driving patterns; short trips accelerate clogging due to incomplete warm-ups, so occasional highway runs help burn off deposits.
For enthusiasts, upgrading to a baffled valve cover minimizes oil pull-through during aggressive cornering, a common issue in sportier Honda models. Pair this with routine inspections every 30,000 miles to catch issues early.
Embracing these strategies not only prevents breakdowns but elevates your driving experience, ensuring that signature Honda V6 smoothness endures.
More from Honda

How to Fix 11th Generation Honda Civic Screen Delamination (2022–2024 Models)
08.12.2025 12:32
How to Disable Honda Walk Away Auto Lock Forever
08.12.2025 12:44
Honda CR-V: Rear Differential Fluid Change for AWD Models
24.12.2025 06:39
Honda Civic Low Beam Headlight Bulb Replacement Trick That Saves Hours and Broken Clips
08.12.2025 09:38
How to Clean the Honda Accord Hybrid Battery Fan Yourself – Full DIY Guide
08.12.2025 08:55