How to Diagnose and Perform 4Runner Transfer Case Actuator Bypass When 4WD Won't Engage
The Toyota 4Runner stands out as a reliable off-road companion, but even this rugged SUV can develop quirks in its 4WD system over time. One of the most frequent culprits behind a failure to engage 4WD is the transfer case actuator — the electric motor and gear assembly responsible for shifting the transfer case between 2WD, 4HI, and 4LO modes. When it sticks, corrodes, or seizes from lack of use, the dashboard lights flash, beeps sound, and the system refuses to cooperate.
Many owners face this exact scenario during unexpected trail conditions or after months of highway-only driving. While full replacement often solves the root issue, a bypass procedure offers a practical workaround. This manual override lets you force the transfer case into the desired mode, restoring functionality without immediate parts replacement. Below is a detailed, step-by-step guide to accurate diagnosis followed by the bypass method.
Understanding the Transfer Case Actuator and Why It Fails
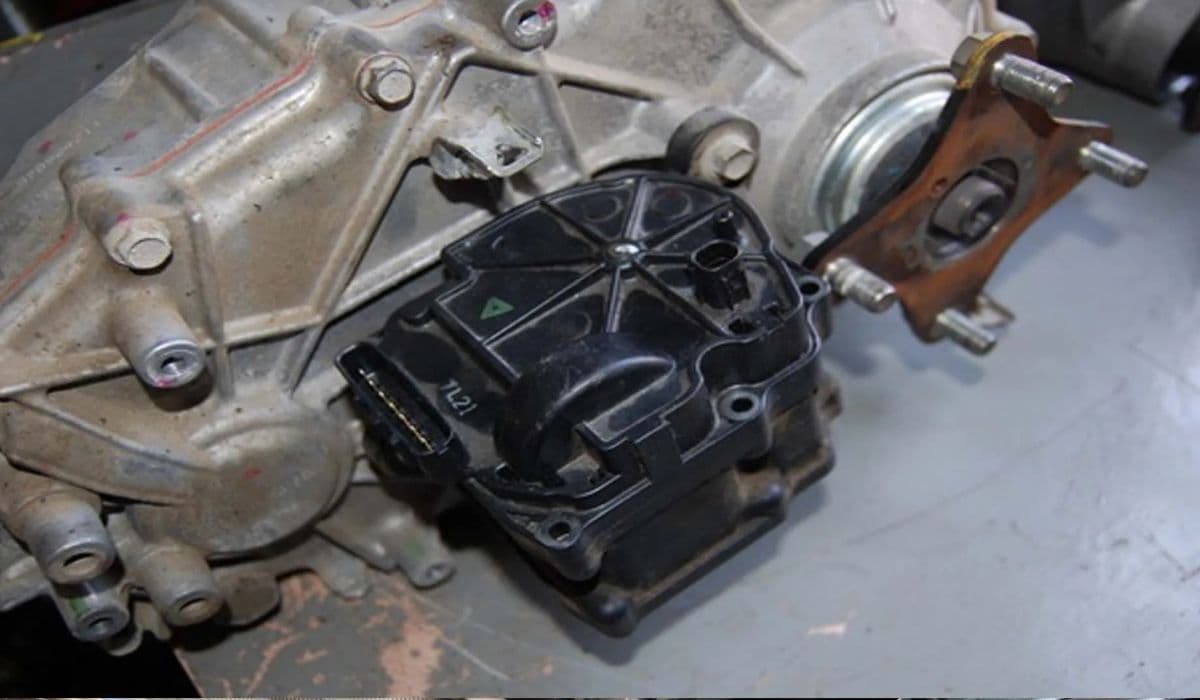
The actuator mounts directly to the transfer case housing. It contains a small DC motor, reduction gears (often plastic), and position sensors that communicate with the 4WD ECU. When you select a mode via the dash switch (or lever in some models), the ECU powers the motor to rotate a shift fork inside the case.
Common failure modes include:
Seizure from inactivity — infrequent 4WD use allows grease to harden, causing the motor or gears to bind.
Corrosion or contamination — water ingress through a failed breather or cracked housing leads to rust on electrical contacts or gears.
Gear stripping or misalignment — plastic gears wear or jump teeth after repeated attempts to shift under load.
Electrical issues — faulty motor windings, bad position switches, or wiring problems prevent activation.
Symptoms almost always appear as:
Blinking 4WD or 4LO indicator lights on the dash.
Audible beeping or warning chimes when attempting to shift.
No engagement despite the switch change (front wheels don't pull).
Occasional grinding noises during shift attempts.
Intermittent success after multiple cycles or temperature changes.
These signs point strongly to the actuator rather than the front differential ADD system, though both can mimic each other.
Step-by-Step Diagnosis Before Attempting Bypass
Proper troubleshooting prevents unnecessary work and confirms the actuator as the problem.
Park on level ground, engine off, and chock the wheels for safety.
Check the basics first: ensure transfer case fluid level is correct and the fluid isn't contaminated or low (dirty fluid accelerates wear).
Inspect visible wiring to the actuator for damage, corrosion, or loose plugs.
Turn the key to ON (engine not running) and cycle the 4WD switch several times while listening under the vehicle — a healthy actuator produces a brief whirring or clicking sound from the motor.
If no sound occurs, use a multimeter to test for 12V power at the actuator connector when shifting modes (consult a wiring diagram for pinouts specific to your generation).
Jack up the front end safely so both front wheels are off the ground, place in neutral, and attempt to shift into 4HI. Spin one front wheel by hand — if the other spins in the opposite direction, the front diff is engaged (ADD working), pointing to a transfer case issue.
For deeper confirmation, listen for motor operation during shift attempts. No movement or erratic behavior strongly implicates the actuator.
If diagnosis confirms actuator failure but replacement isn't feasible immediately, proceed to bypass.
Performing the Transfer Case Actuator Bypass (Manual Shift Method)
This procedure physically rotates the shift mechanism inside the transfer case, overriding the failed actuator. It works on most electronic-shift 4Runners where the actuator is externally mounted.
Safely raise the vehicle and support it on jack stands — never work under a vehicle supported only by a jack.
Locate the actuator on the rear or side of the transfer case (typically a black or silver housing with an electrical connector and three securing bolts).
Disconnect the electrical plug from the actuator to prevent accidental activation.
Remove the three bolts holding the actuator to the transfer case housing (usually 10mm or 12mm). Keep track of them.
Gently pull the actuator straight off. You may need to wiggle it slightly as the output shaft disengages from the internal fork.
With the actuator removed, you'll see a plastic or metal gear/lever protruding from the transfer case opening. This is the manual shift point.
Use pliers, a flathead screwdriver, or your fingers (wear gloves) to rotate this gear or shaft. Positions typically include:
Fully counterclockwise: 2WD (High range, unlocked center diff).
Middle position: 4HI (High range, engaged 4WD).
Fully clockwise: 4LO (Low range, engaged 4WD).
Rotate slowly and feel for detents — the mechanism has distinct stops for each mode. Align it precisely to the desired position.
If the shaft feels bound, rock the rear driveshaft slightly by hand or turn a rear wheel to relieve internal pressure and free the fork.
Once set, reinstall the actuator housing (without the motor if desired for a semi-permanent bypass) and snug the bolts. Some owners leave the actuator removed entirely for a true manual setup, though reinstalling the cover prevents debris entry.
Lower the vehicle, start the engine, and verify operation. In 4HI, both front and rear wheels should pull evenly on loose surfaces. For 4LO, the gearing should feel much lower with noticeable engine braking.
Tips for Successful Bypass and Long-Term Reliability
Exercise the 4WD system monthly — shift into 4HI and 4LO a few times (while stopped and in neutral for low range) to keep grease mobile and prevent future sticking.
If the actuator motor spins but doesn't move the gear, internal plastic gears may have stripped — bypass still works, but full repair eventually requires actuator rebuild or replacement.
Avoid forcing shifts under load — always stop completely and use neutral for mode changes to reduce strain.
After bypass, monitor for unusual noises or vibrations that could indicate misalignment.
For temporary roadside fixes, this method has saved many off-road trips when lights flash and engagement fails.
Mastering this diagnosis and bypass turns a frustrating 4WD failure into a manageable DIY task. With careful execution, your 4Runner regains its full off-road capability quickly and reliably.
More from Toyota
Highlander Hybrid Battery Cooling Fan Cleaning: Complete Step-by-Step Guide
08.12.2025 12:56
Permanent Fix for Toyota 4Runner Liftgate Window Rattle (5th Gen 2010–2024)
08.12.2025 12:51
Camry 2GR-FE V6 Water Pump Replacement DIY – Full Step-by-Step Guide
08.12.2025 10:39
2024 Toyota Tacoma i-FORCE MAX Battery Drain Fix – Complete Owner’s Guide
08.12.2025 10:35
RAV4 Hybrid Inverter Coolant Bleed Procedure: Complete Step-by-Step Guide
08.12.2025 10:31