How to replace control arm bushings (front thrust arms)
BMW's front suspension relies on thrust arms—also called tension struts or radius rods—to manage longitudinal forces during acceleration and braking. These arms connect the front subframe or wheel carrier to the chassis, with large hydraulic or solid rubber bushings at the inner mounting points absorbing impacts. Common across E90/E92 3 Series, E60/E61 5 Series, E82/E88 1 Series, E84 X1, and F30/F32 platforms, these bushings degrade significantly after 60,000-100,000 miles.
Fluid-filled hydraulic variants (standard on many M and xDrive models) leak internally, losing damping and allowing excessive fore/aft movement. Solid rubber bushings crack, harden, or tear from age and heat. Symptoms accelerate with spirited driving, lowered suspensions, or larger wheels increasing leverage. Worn bushings compromise steering precision, braking stability, and overall chassis composure, while permitting clunks over bumps or during load changes.
Detecting Characteristic Signs of Bushing Deterioration
Subtle changes progress to obvious handling flaws. Steering feels vague or wanders under acceleration/braking, with delayed response to inputs. Clunking or knocking from the front end during low-speed maneuvers, potholes, or stop-and-go traffic signals play.
Brake dive increases noticeably, and traction suffers from wheel hop on launch. Visual inspection reveals cracked rubber, fluid seepage around hydraulic bushings, or excessive arm movement when prying with a lever. Uneven tire wear—particularly cupping on inner edges—or vibration through the steering wheel at highway speeds further implicates thrust arm compliance.
Compiling Tools and Selecting Appropriate Replacement Bushings
Professional results demand specialized equipment. Core items include a hydraulic press (20-ton minimum) or dedicated bushing tool set (e.g., Powerflex, Turner Motorsport kits), ball joint separator, torque wrench (up to 200+ Nm), and full socket set with long extensions. Jack stands, wheel chocks, and spring compressors enhance safety.
Bushing choices range from OEM hydraulic (expensive, softer ride) to solid rubber replacements (Lemförder, Meyle HD) for longevity, or polyurethane options (Powerflex Black Series, SuperPro) for sharper response in performance applications. M Performance or reinforced variants suit tuned or track-oriented vehicles. Complete thrust arms with pre-installed bushings simplify labor for those avoiding pressing.
Performing Preliminary Diagnostics and Vehicle Preparation
Confirm bushing involvement before disassembly. Elevate the front end securely, remove wheels, and inspect for fluid leaks or rubber tears. Pry the arm longitudinally—more than 3-5mm play indicates failure.
Rule out ball joint wear (vertical movement) or tie rod issues (lateral play). Support the vehicle on stands at chassis points, leaving suspension loaded initially for accurate torque.
Executing Thrust Arm Removal Safely
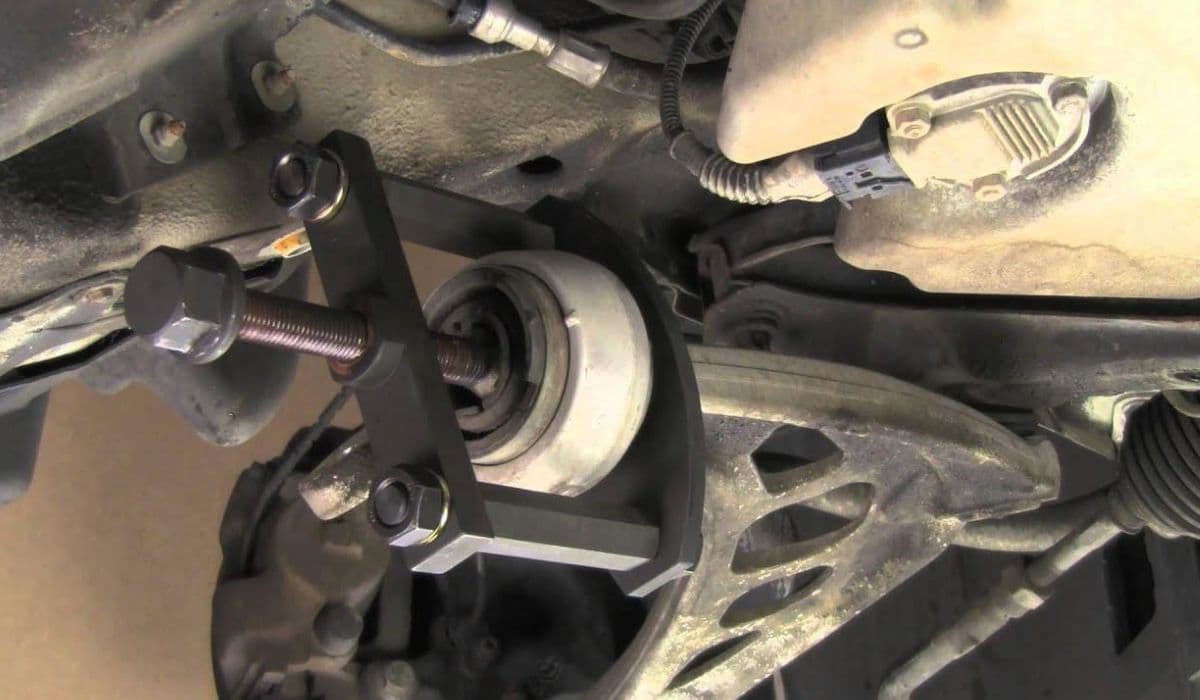
Disconnect the outer ball joint using a separator tool—avoid hammering to prevent boot damage. Unbolt the inner bushing bracket from the subframe (typically two large 21-24mm bolts).
Support the control arm to prevent spring unload. Remove any splash shields or reinforcement braces obstructing access. Mark arm orientation relative to subframe for alignment reference. Extract the arm assembly downward once free—note routing of ABS wires or brake lines.
Extracting Old Bushings and Preparing for Installation
Secure the arm in a vice or press fixture. Hydraulic bushings require careful cutting of the outer shell if seized—avoid damaging the arm bore.
Press old bushings out evenly using correct diameter adapters—apply penetrating oil for corrosion. Clean the mounting bore thoroughly, removing rust or debris. Inspect the arm for cracks or elongation—replace entirely if compromised.
Pressing in New Bushings with Precision Alignment
Lubricate polyurethane or rubber bushings with supplied grease or soapy water—never petroleum products. Align solid bushings with void positioning per manufacturer instructions (often forward-facing for compliance).
Press slowly and squarely until fully seated—verify flange contact. Hydraulic units install in specific orientations; polyurethane requires centering for even deflection. Torque bracket bolts only after suspension is loaded at ride height.
Reinstalling Thrust Arms and Final Torquing
Reverse removal steps: Reconnect ball joint (torque to 100-120 Nm + angular degrees per spec), then inner bracket loosely. Reattach braces and routing clips.
Lower vehicle to ground or load suspension with a jack under the lower control arm to simulate ride height before final torquing (typically 165-200 Nm for inner bolts). Recheck after 500 miles as bushings settle.
Avoiding Frequent Pitfalls During the Procedure
Misaligned pressing damages bushings or arms irreparably. Torquing on unloaded suspension causes premature wear from bind.
Reusing stretched ball joints compromises safety. Skipping cleaning invites seizure or noise. Polyurethane squeaks without proper lubrication. Incorrect void orientation alters handling balance.
Sustaining Front Suspension Integrity Long-Term
Extended durability requires complementary maintenance. Pair bushing renewal with control arm ball joint inspection and replacement if worn.
Perform wheel alignments post-repair—thrust arm changes subtly affect caster and toe. Use quality torque specifications and single-use stretch bolts where applicable. Regular underbody inspections catch early fluid leaks. Upgraded polyurethane suits aggressive driving but increases NVH—choose based on usage. Consistent care preserves sharp steering feel and predictable braking characteristic of BMW chassis design.
More from BMW

How to fix drivetrain malfunction error (2025 models)
13.12.2025 12:24
How to fix charge pipe failure on tuned M3/M4
13.12.2025 18:49
How to fix FRM footwell module lighting issues
13.12.2025 14:40
How to replace transfer case actuator (xDrive grinding noise)
13.12.2025 14:45
How to replace thermostat and coolant flange
13.12.2025 11:34