How to replace oil pan gasket on BMW B58
The BMW B58 engine, found in models like the 340i, 540i, M240i, and even the Toyota Supra A90, is a robust inline-six turbocharged powerplant known for its performance and efficiency. However, over time, oil leaks can develop around the oil pan area, often due to degraded sealing material. While commonly referred to as an "oil pan gasket," the B58 actually uses a liquid sealant rather than a traditional rubber or cork gasket. This guide walks you through the detailed process of resealing the oil pan, which is a labor-intensive job requiring mechanical expertise, proper tools, and patience. Expect it to take 6-12 hours or more, depending on your experience level. Always refer to BMW's official service information for torque specifications and model-specific variations.
Understanding the B58 Oil Pan Sealing System
The B58's oil pan is made of aluminum and bolts directly to the engine block. Unlike older BMW engines with physical gaskets, the B58 relies on a high-quality liquid sealant, such as Loctite 5970, applied in a thin bead to create a watertight seal. This design reduces weight and improves heat dissipation but can fail due to thermal cycling, age, or improper initial installation. Common failure points include the front and rear seals, where oil pressure and vibrations exacerbate wear. If left unaddressed, leaks can lead to low oil levels, engine damage, or even fire hazards from oil contacting hot exhaust components. Diagnosing involves inspecting for oil residue under the vehicle, especially around the subframe and pan edges. Note that similar symptoms might stem from other sources like the oil filter housing or valve cover, so confirm the leak origin with UV dye or a thorough visual check.
Signs of a Failing Oil Pan Seal
Spotting issues early can prevent costly repairs. Key indicators include visible oil drips or puddles under the car after parking, particularly near the front of the engine bay. You might notice a burning oil smell if leaks hit the exhaust manifold. Low oil warnings on the dashboard, even after recent top-ups, signal chronic seepage. During routine oil changes, check for excessive sludge or metal shavings in the drained oil, which could point to internal wear exacerbated by leaks. On higher-mileage B58s (over 70,000 miles), sealant degradation is common, especially in cold climates where contraction stresses the bond. If you see oil on the subframe or suspension components, it's time to act—ignoring it risks contaminating brake parts or causing environmental hazards.
Tools and Parts Required
Gather everything beforehand to avoid mid-job delays. Essential tools include a metric socket set (8mm to 21mm, including wobbly sockets for tight spaces), E-Torx sockets (E8 to E18), breaker bars (1/2" and 3/8"), a transmission jack, engine support brace (like Harbor Freight's 1000 lb model), gasket scraper, plastic razor blades, 90-degree pick tools, needle-nose pliers, a degree torque wrench, and a sealant applicator gun. For parts, you'll need Loctite 5970 sealant (one cartridge), new oil pan bolts if reusing isn't recommended (check for torque-to-yield types), oil filter, strainer with O-ring, engine oil (6.9 quarts of BMW-approved 0W-20 or 0W-30), and one-time-use fasteners like subframe bolts, sway bar nuts, and control arm hardware. Optional upgrades include an updated oil pump if you're accessing it anyway, as early B58 pumps had plastic rings prone to failure. Total parts cost can range from $200-$500 for a basic reseal, excluding labor.
Preparation and Safety Measures
Safety is paramount for this undercar job. Park on a level surface, chock the rear wheels, and disconnect the battery negative terminal to prevent electrical shorts. Use a two-post lift if possible for better access; otherwise, jack stands rated for your vehicle's weight (around 3,500 lbs for most B58-equipped BMWs). Wear gloves, eye protection, and old clothes—oil and sealant are messy. Drain the coolant if needed for related access, but typically not required. Have a fire extinguisher handy, as oil residues can ignite. Document wire harness positions with photos, and label bolts during disassembly. If your B58 has over 100,000 miles, consider inspecting related components like the timing chain or rod bearings while the pan is off. Avoid rushing; improper torque can cause warpage or immediate leaks.
Draining the Oil and Initial Disassembly
Start by warming the engine for 10-15 minutes to thin the oil, then shut it off. Remove the plastic engine cover and oil cap using a 32mm socket. Loosen the oil filter housing to drain residual oil. Place a large drain pan underneath and remove the 17mm drain plug, allowing full drainage—expect 6-7 quarts. While draining, remove front wheels (17mm lug nuts), fender liners (8mm screws and clips), and underbody panels, including the aluminum stiffener plate (16mm bolts; replace all 12). Disconnect O2 sensors and any exhaust sections if they obstruct access, using a 13mm socket for nuts. Inspect for additional leaks here, like from motor mounts. Remove the acoustic engine cover (13mm nut for starter wires, trim clips), and disconnect the oil level sensor. This phase exposes the subframe and pan, setting up for heavier lifting.
Supporting the Engine and Removing the Subframe
The oil pan sits above the subframe, so dropping it is necessary. Install an engine support brace across the strut towers, bolting it securely to the engine's lift points—use ARP bolts for added strength. Remove engine mount fasteners (E14 bolts). Disconnect the steering shaft (E10 bolts; mark for alignment), coolant pipes (E8), sway bar end links (16mm), and wire harnesses (T25 Torx). Separate tie rods (21mm nuts) and control arms (18mm bolts/nuts, E-Torx). Support the subframe with a transmission jack, then remove its bolts: front E14s (74 ft-lb + 55°), rears 21mm and E18 (80 ft-lb + 45°). Lower the subframe carefully, prying if stuck—watch for hung-up lines. This exposes the oil pan fully; the engine now hangs supported, so double-check brace stability before proceeding.
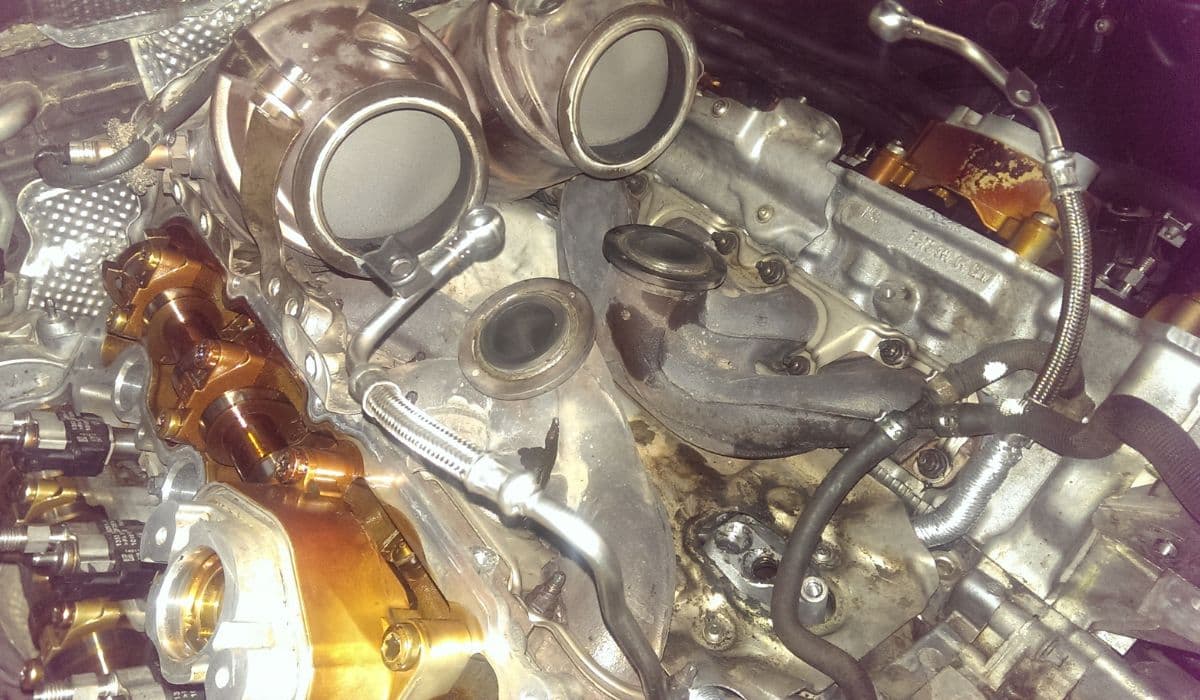
Removing the Oil Pan
With the subframe out, remove the starter motor (3x E10 screws) for clearance. Loosen all oil pan bolts (E10; two long at the rear, three horizontal from transmission side at 14 ft-lb)—hand-loosen first to avoid stripping. Disconnect any remaining clips or sensors. Pry the pan gently with a gasket scraper or plastic blade; it may resist due to old sealant. Once free, drain any residual oil and inspect internals: check the oil pump chain tension (slight looseness is normal), strainer for clogs, and block for sludge. If replacing the oil pump simultaneously (recommended for early B58s), remove its gear screw (left-hand thread; T45 Torx with 18mm wrench to hold), bolts (E10), and dowels. Clean everything thoroughly with brake cleaner.
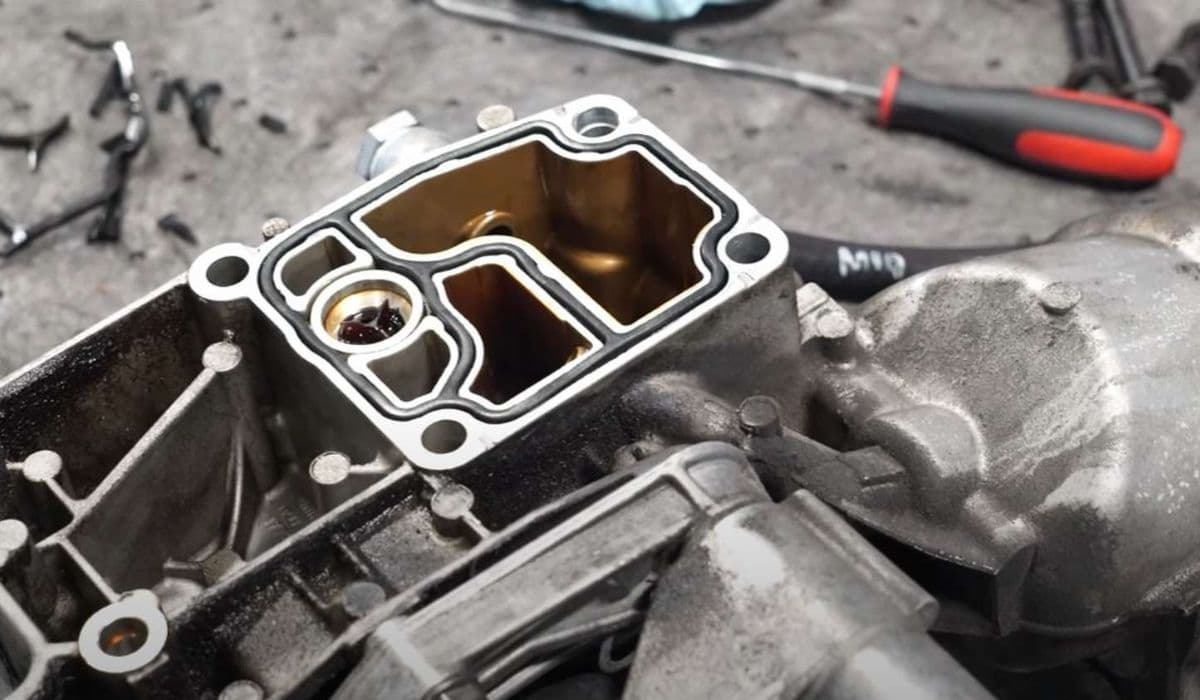
Cleaning Surfaces and Applying New Sealant
Thorough cleaning is critical for a leak-free seal. Use a plastic scraper and brake cleaner to remove all old sealant from the pan and block mating surfaces—aim for bare metal without scratches. Wipe with rags and inspect for warpage or cracks; if damaged, replace the pan (around $800-$1,000). Apply a thin 2mm bead of Loctite 5970 along the pan's groove, following BMW's diagram: minimal around the turbo drain to prevent clogs, and inside bolt holes. Work quickly—sealant skins in 10-12 minutes. Align the pan carefully, ensuring no gaps, and hand-tighten bolts in a crisscross pattern to draw it evenly.
Reinstalling the Oil Pan
Torque the oil pan bolts starting from the center outward: most to 18 ft-lb, transmission-side horizontals to 14 ft-lb. Reinstall the starter (14 ft-lb), oil level sensor, and acoustic cover. If you removed the oil pump, reinstall with new dowels, bolts (15 Nm + 45° crisscross), and gear screw (5 Nm + 90° with red Loctite). Prime the system by cranking briefly with injectors disconnected (or fuse pulled) to circulate oil. This step ensures even sealing and prevents dry starts.
Reassembling the Subframe and Components
Reverse the removal: raise the subframe with the jack, aligning brackets and steering shaft (torque to 21 ft-lb). Install new subframe bolts (torque as specified, using angle marks if no degree wrench). Reattach control arms (74 ft-lb + 90°), tie rods (122 ft-lb), sway bar (41 ft-lb), and harnesses. Lower the engine onto mounts (74 ft-lb) and remove the brace. Reinstall fender liners, wheels (103 ft-lb), exhaust, and underbody panels. Refill with 6.9 quarts of oil, reinstall the filter, and reconnect the battery.
Final Checks and Testing
Start the engine and idle for 10-15 minutes, monitoring for leaks—remove covers initially for easy inspection. Check oil level via the iDrive or dipstick; top up if needed. Drive gently for 30 minutes, then recheck. Perform a follow-up oil change at 500 miles to flush any debris. Scan for codes using an OBD tool, as harness stress might trigger ABS or steering faults. If smoke or drips appear, verify torque and sealant application.
Common Issues and Troubleshooting
Over-torquing bolts can warp the pan, causing immediate leaks—always use a calibrated wrench. Insufficient cleaning leads to poor adhesion; double-check surfaces. Cold weather pump failures (plastic ring cracking) mimic seal issues—upgrade if mileage warrants. Subframe misalignment post-reinstall can cause handling problems; get an alignment. If oil pressure warnings persist, inspect the strainer or pump. Budget for unexpected parts like damaged clips (cheap but essential).
Maintenance Tips for Longevity
Post-reseal, change oil every 5,000-7,500 miles with quality synthetics to minimize thermal stress. Monitor underbody for early leaks during routine inspections. Avoid aggressive driving until 500 miles post-job to let sealant cure. Consider heat shields if leaks were exhaust-related. For tuned B58s, upgraded oil coolers reduce temperatures, extending seal life. Regular cleaning of the engine bay prevents debris buildup that accelerates wear.
More from BMW
How to fix DSC/ABS wheel speed sensor faults BMW
13.12.2025 13:46
How to replace run-flat tires and reset TPMS BMW
13.12.2025 13:40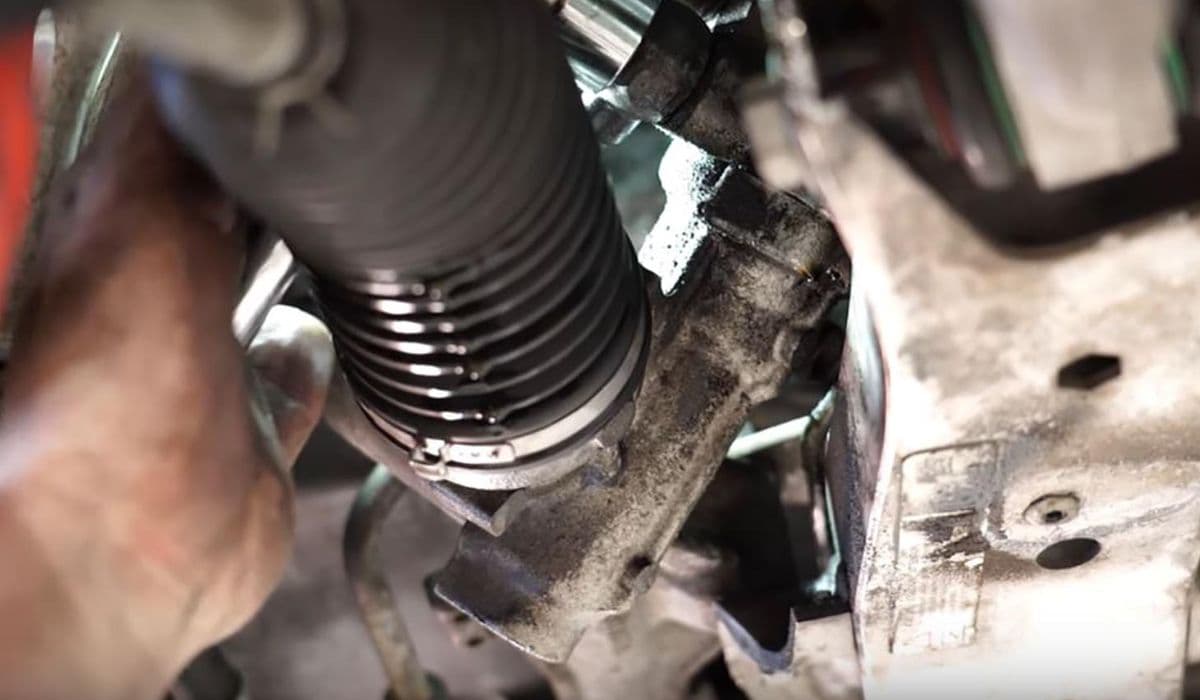
How to fix electronic steering rack clunk BMW
13.12.2025 13:35
How to fix crankcase ventilation (PCV) valve heater BMW
13.12.2025 13:13
How to replace IBS battery sensor false errors BMW
13.12.2025 13:06