How to Change Honda CVT Fluid Properly (Step-by-Step)
Honda Continuously Variable Transmissions (CVT) are known for smooth acceleration and excellent fuel economy, but they are extremely sensitive to fluid condition. Old, degraded, or low CVT fluid is one of the leading causes of shudder, slipping, premature belt/chain wear, and complete transmission failure. Performing a proper fluid change at recommended intervals is the single most important maintenance task for any Honda CVT-equipped vehicle.
This detailed guide covers the complete drain-and-fill procedure that maximizes fluid replacement while protecting the transmission. The method works for most modern Honda CVTs in Honda Fit, Jazz, HR-V, CR-V, Civic, Accord, Odyssey, and Pilot models.
Tools and Materials You Will Need
Genuine Honda HCF-2 CVT fluid (never substitute with ATF DW-1, universal CVT fluid, or aftermarket blends)
3–5 quarts of HCF-2 (exact amount depends on model; most take ~4.2–4.5 quarts on drain-and-fill)
17 mm drain plug washer (crush washer) – always replace
3/8" ratchet and long extension
10 mm socket or wrench for battery tray/cover on some models
Funnel with a long narrow spout
Clean drain pan (5-quart capacity minimum)
Shop rags and nitrile gloves
Jack and jack stands or ramps (optional but recommended for easier access)
Torque wrench (for reinstalling drain plug)
Safety Precautions Before Starting
Park the vehicle on a completely level surface. CVT fluid level is checked only when the transmission is at a specific temperature and the car is level. Any tilt will give a false reading and can lead to severe over- or under-filling.
Engage the parking brake and chock the wheels. Allow the engine to cool for at least 30 minutes if it was recently driven – hot CVT fluid can exceed 200 °F and cause serious burns.
Locating the CVT Drain Plug and Dipstick
The drain plug is on the bottom of the transmission case, usually facing the driver-side wheel. It uses a 17 mm hex head and has a crush washer.
The dipstick/filler tube is typically on the passenger side of the transmission, near the battery or airbox. Some newer models (2023+ Civic, CR-V, HR-V) have a sealed unit with a level check plug instead of a traditional dipstick – the procedure is slightly different and described at the end.
Step 1 – Warm Up the Transmission to Operating Temperature
Start the engine and let it idle until the cooling fan cycles on twice, or drive gently for 10–15 minutes. Ideal fluid temperature for draining and checking level is 95–105 °F (35–40 °C). Too cold and thick fluid will not drain completely; too hot and you risk burns and inaccurate level check later.
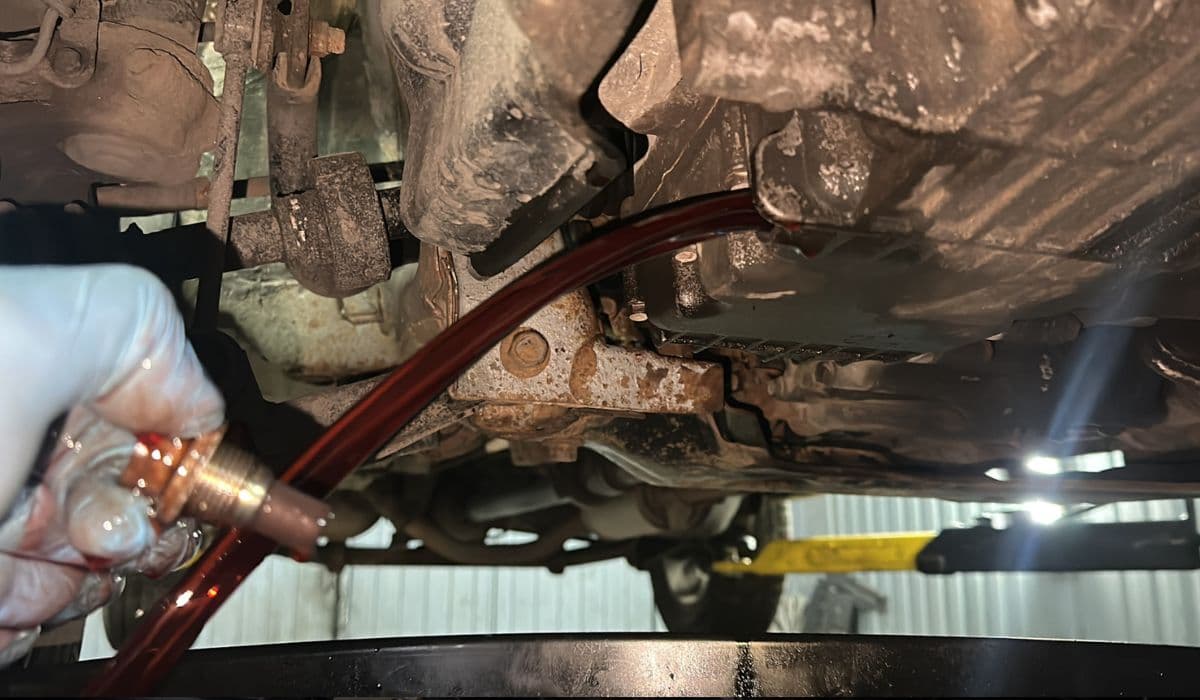
Step 2 – Drain the Old Fluid
Place the drain pan directly under the plug.
Remove the dipstick and leave it out – this allows air to enter and fluid to drain faster.
Using a 17 mm wrench, slowly loosen the drain plug. Final turns by hand to control the flow.
Allow the transmission to drain fully – this can take 10–15 minutes. Expect 3.5–4.5 quarts depending on model.
Inspect the drained fluid. Normal used HCF-2 is dark green/black but still translucent. If it is brown, smells burnt, or contains metal particles, further diagnosis is required.
Step 3 – Replace the Crush Washer and Reinstall Drain Plug
Install a new Honda crush washer (P/N 94109-17000). Torque the drain plug to exactly 29 lb-ft (40 Nm) on most models or 36 lb-ft (49 Nm) on Odyssey/Pilot. Over-tightening strips the aluminum case.
Step 4 – Initial Fill with New HCF-2 Fluid
Insert the long funnel into the dipstick tube. Pour in the exact amount that came out (usually 4.0–4.4 quarts). It is better to be slightly under than over at this stage.
Step 5 – Start Engine and Cycle Through Gears
Start the engine and let it idle. Slowly shift from P → R → N → D → S (or L) and back to P, holding each gear for 5–10 seconds. This circulates new fluid through the torque converter, cooler, and valve body. Do this cycle 3–4 times.
Step 6 – Perform 3x Drain-and-Fill Cycles (Critical for Maximum Refresh)
A single drain only replaces ~40–45% of total fluid because most remains in the torque converter and cooler. For best results and longest CVT life, perform three complete drain-and-fill cycles with short drives in between:
After the first fill and gear cycle, repeat Steps 2–5.
Drive the vehicle 10–20 miles to fully mix and heat the fluid.
Repeat drain-and-fill a third time.
After three cycles you will have replaced 75–85% of the old fluid – far superior to a single change or flush machine.
Step 7 – Final Level Check Procedure (Most Important Step)
This must be done precisely:
Park on perfectly level ground.
Start engine and bring fluid temperature to 95–113 °F (35–45 °C). You can use an OBD-II scanner or infrared thermometer pointed at the transmission case.
With engine running, shift through all gears again as in Step 5.
Shift to Park, remove dipstick, wipe clean, reinsert fully for 5 seconds, remove and read level.
Fluid should be between the upper and lower holes on the dipstick when hot. Add small amounts (4–6 oz at a time) if low, repeating the gear cycle and check until correct.
Do NOT overfill. Excess fluid causes foaming, overheating, and rapid belt wear.
Special Notes for 2023+ Models Without Dipstick (Sealed CVT)
Newer Civic, CR-V, HR-V, and Accord use a side check plug instead of a dipstick:
After the third fill, run the engine until fluid temp is ~104 °F (40 °C).
Remove the 24 mm level check plug on the side of the transmission.
Fluid should slowly drip out. If nothing comes out, add fluid is low – add through the top fill port until it drips. If a heavy stream pours out, it is overfilled – drain until only a drip.
How Often Should You Change Honda CVT Fluid?
Honda officially states “lifetime fluid” under normal conditions, but real-world experience and numerous technical service bulletins show severe shudder and failures when fluid is left unchanged past 50,000 miles.
Recommended interval for long CVT life:
Normal driving: every 30,000–40,000 miles or 3 years
Severe conditions (towing, hot climate, stop-go traffic): every 15,000–25,000 miles
Common Mistakes That Destroy Honda CVTs
Using non HCF-2 fluid (Valvoline, Idemitsu, etc.) – destroys friction properties in 5,000 miles or less
Performing a flush machine exchange – high pressure can damage clutches and valves
Overfilling or underfilling by even 0.5 quart
Skipping multiple drain cycles and assuming one change is enough
Checking level with engine off or car not level
Following this exact procedure with genuine Honda HCF-2 and three drain-and-fill cycles will dramatically extend the life of your Honda CVT and prevent the extremely expensive repairs associated with neglected fluid maintenance.
More from Honda
How to Fix VTC Actuator Rattle Honda Civic 2016-2021
08.12.2025 11:54
How to Fix Honda Civic 10th Generation Infotainment System Random Rebooting
08.12.2025 12:01Honda CR-V 1.5T Turbo Coolant Leak – Complete DIY Repair Guide
08.12.2025 12:03
How to Fix and Prevent Premature Brake Wear on Honda Accord 2018–2022
08.12.2025 12:06
VTEC Not Working? 5 Reasons and How to Fix It Yourself
02.12.2025 13:01