How to clean battery Tesla cooling valve (overheating alerts)
Tesla vehicles rely on a sophisticated thermal management system to keep the high-voltage battery at optimal temperatures. Overheating alerts often signal restrictions in coolant flow, and one common culprit is a dirty or partially clogged cooling valve. These valves, such as the 3-way or multi-way actuators in the Superbottle assembly, direct coolant between the battery pack, radiator, chiller, and other components. When debris, sediment, or old coolant buildup accumulates inside the valve, it can cause improper flow, reduced cooling efficiency, and persistent overheating warnings.
Cleaning the cooling valve isn't a routine task recommended by Tesla, but for owners facing recurring alerts after basic checks, addressing buildup can restore performance. This guide provides a detailed, step-by-step approach to safely clean the valve while emphasizing safety and best practices.
Understanding the Cooling Valve and Its Role
The cooling valve in Tesla models like the Model 3, Y, S, or X is a motorized actuator that routes coolant through various loops. It switches between modes (series or parallel) to prioritize battery cooling during high-demand situations like fast charging, aggressive driving, or hot weather.
Common valve types: 3-way radiator bypass, 4-way series/parallel, or integrated in the Superbottle.
Why it clogs: Over time, mineral deposits from coolant, debris from manufacturing, or contamination from leaks can restrict movement.
Symptoms of a dirty valve: Overheating alerts, loud fan operation, reduced charging speeds, or power limitations.
Regular maintenance like checking coolant levels and driving in varied conditions helps prevent issues, but cleaning becomes necessary when alerts persist.
Safety Precautions Before Starting
Working on the high-voltage system demands caution. Always prioritize safety:
Park the vehicle on a level surface and turn it off.
Disconnect the low-voltage (12V) battery to prevent accidental activation.
Wear protective gloves, safety glasses, and avoid contact with coolant, which is toxic.
Work in a well-ventilated area, as coolant vapors can be harmful.
Never open the coolant reservoir cap while the system is hot or pressurized.
If you're unsure, consult a Tesla-certified technician.
Tools and Materials Needed
Gather these items for a thorough cleaning:
Basic socket set and wrenches (10mm, 13mm common).
Drain pan and rags.
Compressed air blower or shop vacuum.
Mild solvent (distilled water with a small amount of approved cleaner).
New O-rings or gaskets if disassembly requires it.
Coolant (Tesla-specific or compatible G48/Glycol mix).
Avoid harsh chemicals that could damage seals.
Step-by-Step Cleaning Process
1. Drain the Coolant System
Begin by relieving pressure and draining coolant to access the valve safely.
Locate the coolant reservoir under the front trunk.
Remove the cap carefully.
Position a drain pan under the lower hoses.
Disconnect hoses connected to the valve (use clips to prevent spills).
Allow coolant to drain fully.
This step minimizes mess and exposure.
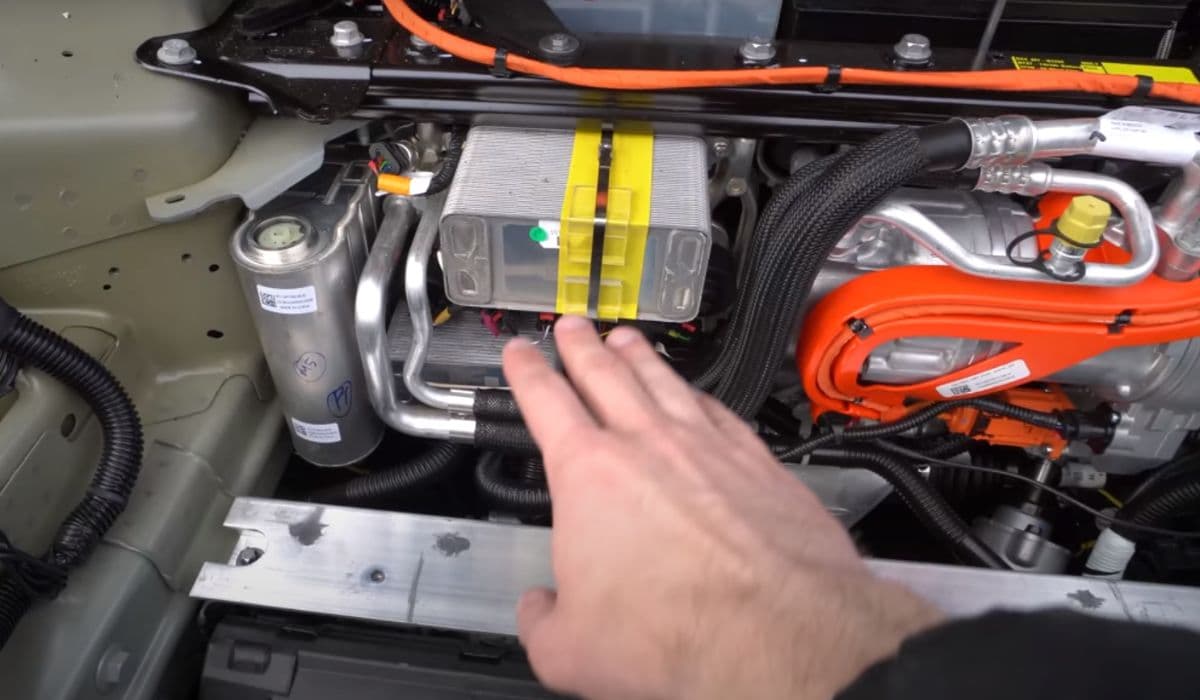
2. Access the Cooling Valve
The valve is typically in the front underhood area or near the battery pack.
Remove underhood panels or wheel liners for access.
Disconnect the electrical connector to the valve actuator.
Unbolt the valve from its bracket (torque specs around 5-10 Nm).
Carefully remove hoses, noting their positions for reassembly.
Label connections to avoid confusion later.
3. Disassemble and Inspect
Once removed, disassemble the valve carefully.
Remove any snap rings or retaining clips.
Separate the actuator from the valve body.
Inspect for visible buildup: sediment, corrosion, or stuck rotors.
Check the actuator motor for smooth operation.
If the valve is seized, replacement may be needed instead of cleaning.
4. Clean the Valve Components
Use gentle methods to remove debris without damaging seals.
Flush internal passages with distilled water.
Use compressed air to blow out loose particles.
For stubborn buildup, soak in mild solvent and scrub with a soft brush.
Rinse thoroughly and dry completely.
Ensure no residue remains, as it could cause future clogs.
5. Reassemble and Reinstall
Reverse the disassembly steps with care.
Replace any worn O-rings or seals.
Reconnect hoses securely and torque bolts properly.
Reattach the electrical connector.
Refill the system with fresh coolant.
6. Bleed and Test the System
Air bubbles can cause issues post-cleaning.
Refill the reservoir slowly.
Run the vehicle's thermal system in Service Mode (if available) to circulate and purge air.
Monitor for leaks and check temperature readings.
Test drive to verify no overheating alerts.
Observe fan operation and battery temps during charging.
Preventive Tips to Avoid Future Clogging
Keep the system clean long-term with these habits:
Park in shaded areas during hot weather.
Avoid repeated fast charging in extreme heat.
Schedule regular coolant checks via the touchscreen.
Use only approved coolant to prevent deposits.
These steps reduce thermal stress and extend component life.
More from Tesla

How to fix HVAC blend door actuator clicking noise Tesla
16.12.2025 13:16
How to fix FSD visualization lag after Tesla 2025.14 update
16.12.2025 07:02
How to fix phantom drain overnight Tesla
16.12.2025 04:50
How to replace octopus coolant leak (Tesla Model 3 2017–2020)
16.12.2025 03:21
How to replace torn rear seat bolsters Tesla
16.12.2025 03:09