How to fix Tesla rattling noise from front suspension (Tesla Model 3/Y)
Tesla Model 3 and Model Y owners often encounter a frustrating rattling noise from the front suspension, especially when driving over uneven roads, bumps, or at low speeds. This issue disrupts the otherwise whisper-quiet electric driving experience these vehicles are known for. The good news is that it's a common problem with identifiable causes and practical solutions. Understanding the root of the noise can help you address it effectively, restoring smoothness to your ride.
Understanding the Rattling Noise
The front suspension in the Tesla Model 3 and Model Y uses a sophisticated multi-link design to balance handling, comfort, and efficiency. However, certain components can develop play or wear over time, leading to audible rattles. The noise typically manifests as a loose, metallic clunk or rattle when the suspension compresses or rebounds, such as hitting potholes or speed bumps.
It often sounds like something is loose under the car.
The rattle may be more noticeable on one side (driver or passenger).
It can worsen in cold weather or after the car has been sitting.
Ignoring this noise isn't just annoying—it can indicate wear that affects handling and tire life if left unchecked. Fortunately, most cases stem from a few recurring components.
Common Causes of Front Suspension Rattling
Several parts in the front suspension are prone to causing rattles due to design, wear, or environmental factors like moisture ingress.
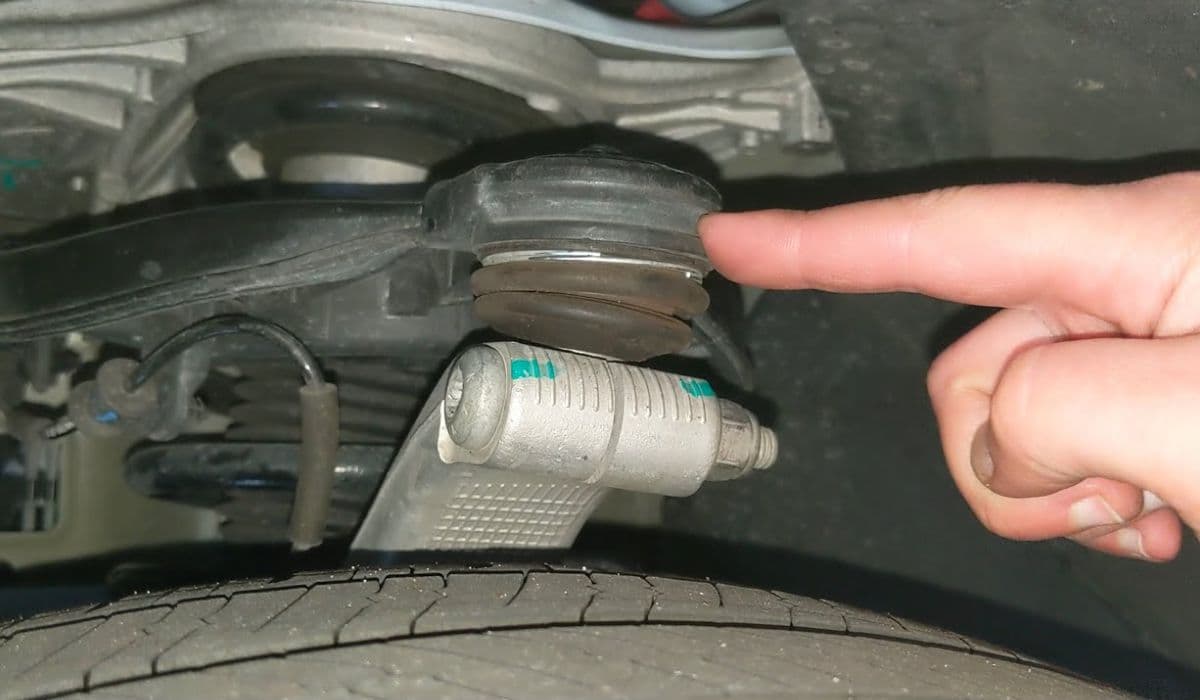
Worn Front Upper Control Arms (FUCA)
This is by far the most frequent culprit. The ball joint in the upper control arm can dry out or seize, creating a clunking rattle over bumps.
The noise often combines with creaking when turning the steering wheel at low speeds.
Moisture can accelerate wear by compromising the seal around the ball joint.
Many owners report this starting after moderate mileage on rough roads.
Damaged Bushings in Lower Links
The front lower compliance (fore) links and lateral links have rubber bushings that manage fore-aft and side-to-side movement.
Torn or separated bushings allow metal-on-metal contact, producing a crunching or rattling sound during acceleration, braking, or turning.
These bushings endure significant stress from the instant torque of electric motors.
Visual inspection often reveals tearing around the bushing voids.
Loose or Worn Sway Bar Links
Sway bar end links connect the anti-roll bar to the suspension.
Wear here causes a distinct rattle over uneven surfaces, especially at lower speeds.
Loose bolts in the suspension assembly can mimic this, amplifying vibrations.
Other less common sources include damaged aero panels underneath or even unrelated parts like headlight housings vibrating, but true suspension rattles usually tie back to the above.
Diagnosing the Issue Yourself
Before heading to a service center, perform some basic checks to pinpoint the source. Safety first: park on a level surface, engage the parking brake, and jack the car properly if needed.
Drive over a bumpy road at low speed and note when the noise occurs (braking, accelerating, turning, or straight-line bumps).
With the car stationary, push down firmly on each front corner and listen for rattles as the suspension rebounds.
Gently rock the steering wheel side-to-side while parked to check for creaks.
Inspect visible components: raise the car and look for torn bushings, play in ball joints, or loose bolts.
Recording a video of the noise during a test drive can be invaluable for technicians.
Professional Repair Options
The most reliable fix involves addressing the worn components directly.
Replacing Upper Control Arms
For ball joint issues in the FUCA:
Technicians replace the entire arm assembly since the joint isn't separately serviceable.
Newer designs incorporate better sealing to resist moisture.
Often done in pairs for balanced handling.
Addressing Lower Link Bushings
For torn bushings:
Replace the compliance or lateral links.
Upgraded aftermarket bushings can provide longer durability by filling voids and reducing flex.
Tightening and Inspecting
Sometimes, simply re-torquing suspension bolts to specification resolves rattles caused by minor loosening over time.
Tesla service centers are familiar with these issues and can perform thorough diagnostics, including road tests with a technician.
DIY Approaches and Precautions
While major replacements require tools and expertise, some owners explore temporary fixes.
Lubricating ball joints with injected grease via a needle can quiet creaks for months, though it's not a permanent solution.
Checking and tightening accessible bolts yourself may help if looseness is the issue.
However, suspension work affects safety and alignment. Improper repairs can lead to uneven tire wear or handling problems. Always follow torque specifications precisely and consider a professional alignment afterward. If you're not experienced with automotive repairs, it's best to leave it to experts.
Preventing Future Rattles
Maintaining your suspension prolongs its life and keeps rattles at bay.
Avoid aggressive driving over poor roads when possible.
Regular inspections during tire rotations can catch wear early.
Keeping the underbody clean reduces debris that might contribute to issues.
With proper attention, your Model 3 or Y can deliver the silent, composed ride it's designed for.
More from Tesla

How to fix FSD visualization lag after Tesla 2025.14 update
16.12.2025 07:02
How to replace Tesla Model 3/Y rear bumper clips (easy DIY)
16.12.2025 05:46
How to fix phantom drain overnight Tesla
16.12.2025 04:50
How to replace octopus coolant leak (Tesla Model 3 2017–2020)
16.12.2025 03:21
How to replace torn rear seat bolsters Tesla
16.12.2025 03:09