How to replace frunk hood struts that won’t stay open Tesla
The front trunk, or frunk, in Tesla vehicles like the Model 3, Model Y, Model S, and Model X relies on gas-charged struts to hold the hood open securely. Over time, these struts can lose pressure, leading to a frustrating issue where the frunk hood slowly drops or refuses to stay fully raised. This not only makes accessing storage space inconvenient but can also pose a safety risk if the heavy hood closes unexpectedly. Fortunately, replacing the frunk hood struts is a straightforward DIY task that most owners can complete with basic tools, restoring reliable operation and even improving functionality.
Understanding Frunk Hood Strut Failure
Gas struts, also known as lift supports, work by using pressurized nitrogen gas to provide smooth lifting force. In Teslas, the factory struts are designed conservatively to ensure the hood doesn't open too aggressively, but this can lead to premature wear.
Common symptoms of failing struts include:
The hood sagging or closing on its own after being opened.
Difficulty keeping the frunk fully raised, especially in colder weather when gas pressure drops.
Uneven lifting, where one side stays up while the other droops.
A noticeable "creak" or lack of resistance when opening manually.
These issues often appear after extensive use or exposure to temperature fluctuations. Weak struts diminish the convenience of the frunk, which is one of the standout features of Tesla's design—offering ample weather-protected storage without compromising aerodynamics.
Tools and Materials Needed
Before starting, gather the essentials for a smooth replacement process. This job typically takes 15-30 minutes and requires no specialized equipment.
Essential tools:
Flathead screwdriver or plastic trim removal tool (to avoid scratching paint).
A sturdy prop, such as a broom handle, wooden dowel, or dedicated hood prop rod.
Gloves for better grip and protection.
Replacement struts come in pairs—one for each side. Opt for high-quality aftermarket options designed specifically for Tesla models, as they often provide stronger lift than stock while maintaining safety. Ensure compatibility with your specific model, as strut lengths and mounting points vary slightly between Model 3/Y and older Model S/X.
Safety Precautions Before Starting
Safety is paramount when working under a heavy hood. The frunk lid is lightweight compared to traditional engine hoods but can still cause injury if it falls.
Key safety tips:
Work in a level, well-lit area with the vehicle parked and in Park mode.
Always use a reliable prop to support the hood during removal—never rely solely on weakened struts.
Replace one strut at a time to keep the hood supported by the remaining original.
Have an assistant if possible, especially for the first attempt.
Avoid forcing components; if something doesn't release easily, double-check the clip position.
Taking these steps prevents accidents and ensures the job goes smoothly.
Step-by-Step Guide to Removing Old Struts
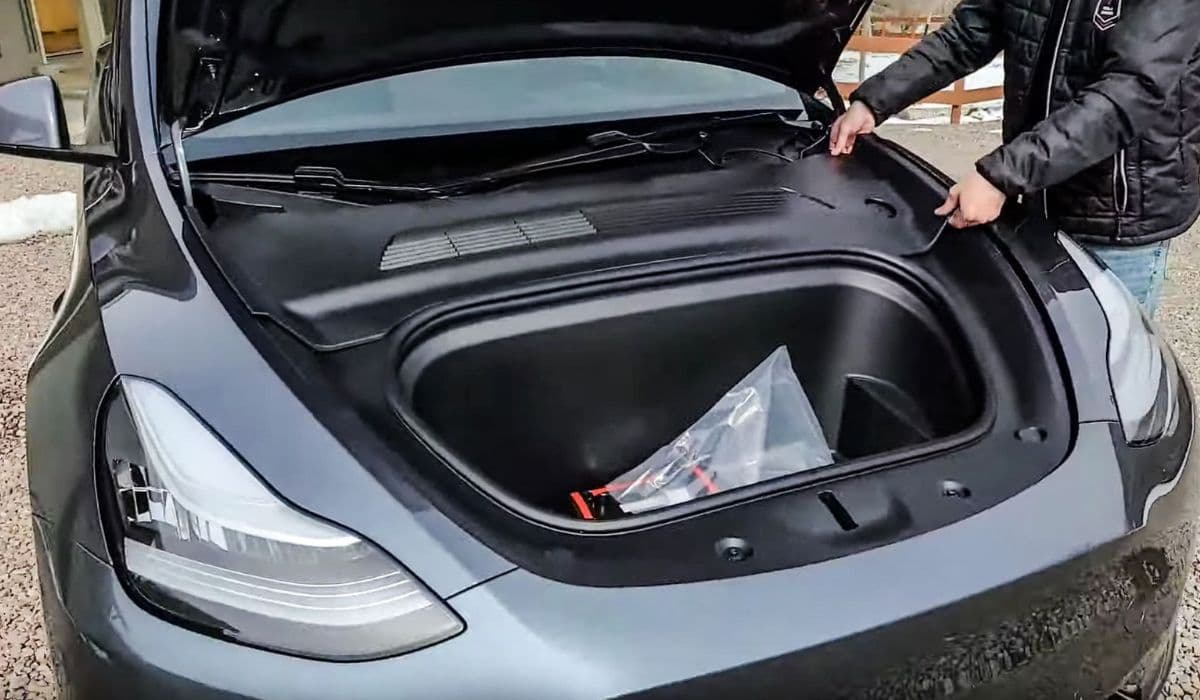
Begin by opening the frunk using the touchscreen, app, or key fob. Manually lift the hood fully to access the struts, located at the rear corners near the hinges.
Removal process:
Prop the hood securely with your chosen support tool, positioning it centrally for balanced hold.
Locate the metal retaining clips at both ends of the strut (ball-and-socket joints).
Use a flathead screwdriver to gently pry the spring clip away from the ball mount—start with the upper (hood-side) connection for easier access.
Once the clip releases, pull the strut socket off the ball stud with a firm tug.
Repeat for the lower (body-side) connection, then remove the old strut entirely.
Work on one side first. The remaining strut will help hold the hood while you install the new one. Inspect the ball mounts for dirt or corrosion and clean them if needed for a secure fit.
Installing New Frunk Hood Struts
New struts arrive compressed and ready to install. Orientation matters—the thicker cylinder end typically attaches to the hood, but check against your old strut for confirmation.
Installation steps:
Align the lower socket with the body-side ball stud and push firmly until it snaps into place with an audible click.
Slightly lower the hood if necessary to reduce tension, then attach the upper socket to the hood-side ball.
Ensure both clips fully engage—no play should be felt when gently testing.
Remove the prop and test the lift: the hood should rise smoothly and hold firmly at full extension.
Repeat the process for the second strut.
After both are installed, open and close the frunk several times to verify even operation. New struts may feel stiffer initially but will settle with use.
Common Mistakes to Avoid
Even experienced DIYers can encounter pitfalls during this replacement.
Frequent errors include:
Removing both struts simultaneously, risking the hood slamming down.
Damaging paint or clips by using metal tools aggressively—always opt for plastic pry tools.
Incorrect orientation, leading to binding or reduced lift height.
Forgetting to test in various temperatures, as cold weather can temporarily affect performance.
If the hood doesn't align perfectly afterward, minor adjustments to the hood bump stops can fine-tune closure.
Benefits of Upgraded Replacement Struts
Beyond fixing the "won't stay open" problem, many owners choose slightly stronger aftermarket struts for enhanced convenience. These can allow the frunk to open more fully or even partially auto-lift after electronic release, making hands-free operation easier when carrying items.
Long-term advantages:
Improved durability against wear and environmental factors.
Smoother, more controlled motion without excessive force.
Restored confidence in using the frunk for groceries, gear, or emergency storage.
This simple upgrade highlights why many Tesla enthusiasts appreciate the vehicle's modular design—easy maintenance that keeps the car feeling new.
Testing and Final Adjustments
Once installed, thoroughly test the setup. Open the frunk remotely and observe for smooth, balanced lifting. Hold it open for several minutes to confirm no sagging occurs.
If issues persist:
Double-check clip engagement on all joints.
Ensure no debris interferes with the sockets.
Consider temperature effects—struts perform best in moderate conditions.
With proper installation, your Tesla's frunk will once again provide reliable, effortless access, enhancing the everyday ownership experience.
More from Tesla

How to fix FSD visualization lag after Tesla 2025.14 update
16.12.2025 07:02
How to replace Tesla Model 3/Y rear bumper clips (easy DIY)
16.12.2025 05:46
How to fix phantom drain overnight Tesla
16.12.2025 04:50
How to replace octopus coolant leak (Tesla Model 3 2017–2020)
16.12.2025 03:21
How to replace torn rear seat bolsters Tesla
16.12.2025 03:09