How to replace horn pad Tesla (recall-related airbag)
Tesla vehicles integrate the horn function directly into the driver's airbag module, commonly referred to as the horn pad. This design streamlines the steering wheel but can lead to issues if the wrong variant is installed during service. A specific recall addresses cases where mismatched airbag modules cause horn failure, while airbag deployment remains unaffected. Understanding this process helps owners recognize symptoms and handle repairs effectively.
Understanding the Recall and Horn Pad Issue
In certain Model S and Model X vehicles, service procedures occasionally resulted in installing an incompatible driver airbag module. There are two main types: one for steering configurations with a mechanical press-to-honk pad and another for capacitive touch-based systems.
Mismatched modules prevent the horn from activating when pressed.
This affects only a limited number of vehicles that underwent prior steering wheel or airbag service.
The core airbag inflation system operates normally, maintaining crash protection.
Owners experiencing no horn response should first verify if their vehicle is impacted. Symptoms include complete silence when pressing the center pad, even though other steering controls function properly. Early detection avoids reliance on alternative warning methods in traffic.
Safety Precautions Before Starting Any Work
Working with airbag systems demands strict caution, as improper handling risks accidental deployment or injury.
Always disconnect the vehicle's low-voltage battery to depower the supplemental restraint system (SRS).
Wait at least several minutes after disconnection to allow residual energy to dissipate.
Handle the airbag module by its edges only, avoiding contact with the front face.
Store removed modules upright in a secure location, away from heat or impact sources.
Wear protective gloves and eye gear throughout the procedure.
Professional service is strongly recommended for most owners, especially under recall conditions where repairs are handled at no charge.
Tools and Preparation Required
Gathering the right tools ensures a smooth process if attempting inspection or replacement.
Valve core removal tools or similar thin pry implements for releasing airbag clips.
Torque wrench for precise fastener tightening.
Trim removal tools to avoid damaging steering wheel components.
Diagnostic access via the vehicle's touchscreen or service mode.
Park the vehicle in a well-lit, level area with the wheels straight. Adjust the steering column for easy access. If proceeding DIY, reference official service guidelines closely, as variations exist between round wheels and yokes.
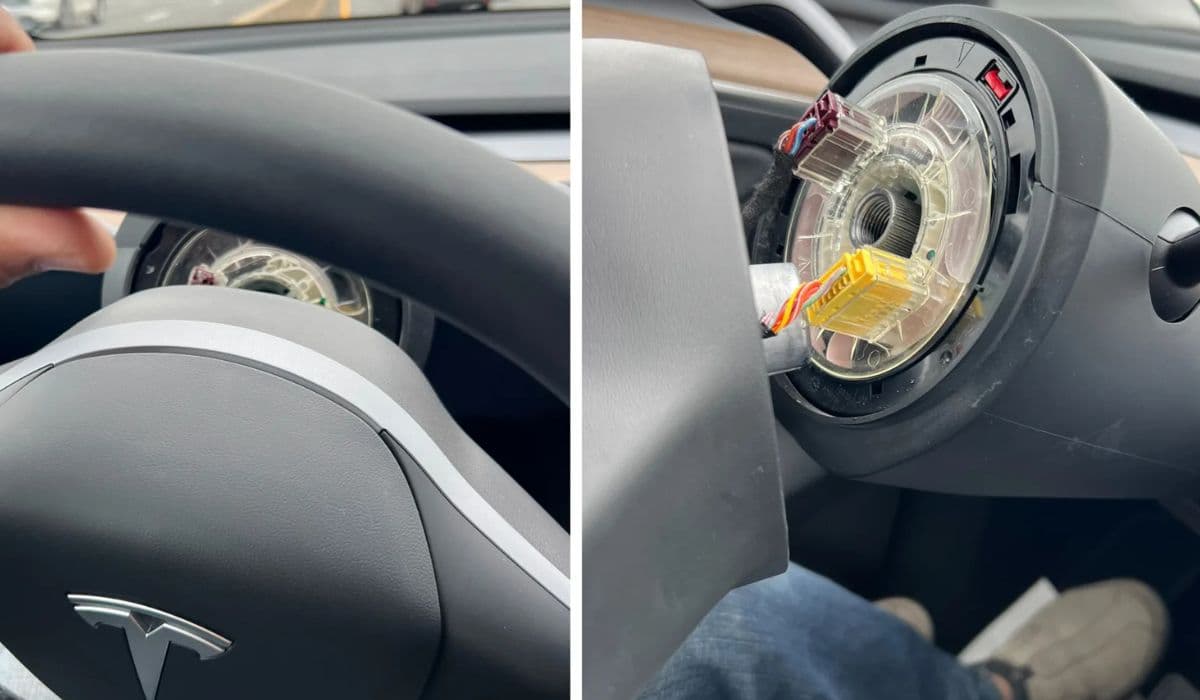
Step-by-Step Removal of the Driver Airbag Module
The horn pad is part of the integrated airbag unit, so replacement involves removing this module.
Access the release points on the steering wheel's rear or sides.
Carefully insert tools to depress retaining springs or clips simultaneously.
Gently pull the module forward, disconnecting any electrical harnesses.
Inspect the module for labels indicating compatibility with your steering type.
During removal, note how wiring routes to prevent pinching on reinstallation. Common challenges include stiff clips on older assemblies, requiring even pressure to avoid breakage.
Inspecting and Identifying the Correct Horn Pad Variant
Once removed, examine the airbag module:
Look for markings denoting mechanical or non-mechanical horn integration.
Compare against your steering wheel or yoke configuration.
Mechanical variants require physical pressure to activate contacts.
Non-mechanical rely on touch sensitivity.
Mismatches often stem from service parts mix-ups. If incorrect, the horn circuit fails to complete, explaining the recall focus on post-service vehicles.
Installation of the Replacement Airbag Module
With the correct module obtained:
Align and connect electrical harnesses securely.
Position the unit into the steering wheel hub.
Push firmly until clips engage with audible clicks.
Reconnect low-voltage power and test horn function immediately.
Calibration may be needed via the vehicle's service mode to register the new module type. Verify full operation, including multiple presses from different angles.
Post-Replacement Testing and Verification
After installation:
Test the horn in various scenarios for consistent response.
Check steering wheel controls and airbag warning lights.
Drive briefly to confirm no new issues arise.
If the horn remains inoperative, recheck connections or seek professional diagnosis. Proper reconfiguration ensures seamless integration with the vehicle's systems.
When to Seek Professional Tesla Service
While some enthusiasts perform this task, Tesla's recall program offers expert handling.
Mobile or center technicians perform inspections quickly.
They use precise tools and verified parts.
Software updates may accompany to optimize horn mapping.
This approach guarantees compliance and peace of mind, especially for safety-critical components.
Mastering the nuances of Tesla's integrated horn pad design empowers owners to address recall-related concerns effectively. Staying proactive with vehicle notifications keeps your drive safe and reliable.
More from Tesla

How to fix HVAC blend door actuator clicking noise Tesla
16.12.2025 13:16
How to fix FSD visualization lag after Tesla 2025.14 update
16.12.2025 07:02
How to fix phantom drain overnight Tesla
16.12.2025 04:50
How to replace octopus coolant leak (Tesla Model 3 2017–2020)
16.12.2025 03:21
How to replace torn rear seat bolsters Tesla
16.12.2025 03:09