How to replace supercharger manifold valve Tesla (leaking coolant)
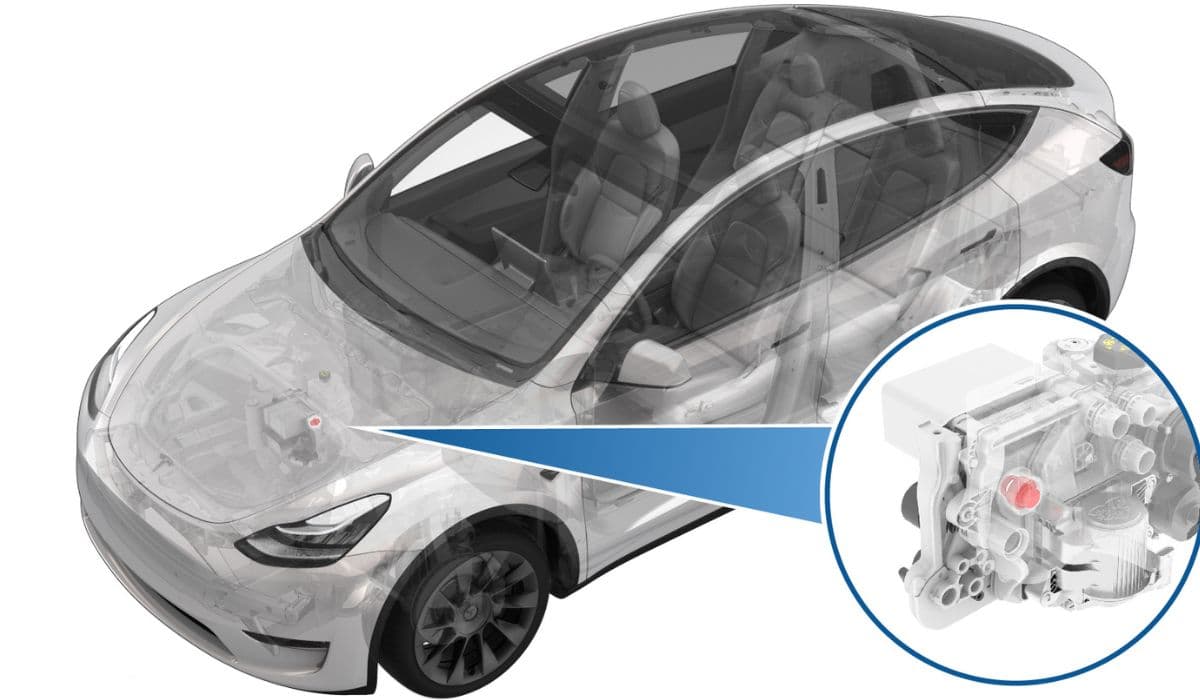
Tesla's advanced thermal management system relies on precise components to keep the battery, motors, and cabin at optimal temperatures. One critical part is the coolant valve integrated into the supercharger manifold assembly, often referred to as the supermanifold in heat pump-equipped models. This valve directs coolant flow through various loops, ensuring efficient heating and cooling. Over time, seals can degrade, leading to coolant leaks that manifest as puddles under the vehicle or low coolant warnings on the dashboard.
Addressing a leaking coolant valve promptly prevents overheating, reduced performance, or more extensive damage to the thermal system. While Tesla recommends professional service for high-voltage components, experienced owners with the right tools can tackle this repair. This guide walks through the process in detail, focusing on safety and precision.
Understanding the Supercharger Manifold Valve and Leak Causes
The supermanifold is a sophisticated aluminum and polymer assembly that combines multiple coolant ports, pumps, and valves into one unit. The primary valve—often an octovalve or multi-port actuator—controls flow between the battery pack, drive units, chiller, and radiator. It operates electronically, adjusting positions for series or parallel coolant routing based on thermal demands.
Common leak sources include worn O-rings, cracked housings from thermal cycling, or actuator failures that cause improper sealing. Symptoms go beyond visible drips:
Sweet-smelling blue or green fluid under the frunk or mid-underbody area
Frequent low coolant alerts
Inconsistent cabin heating or cooling
Reduced supercharging speeds due to thermal limiting
Unusual pump noises or error codes related to thermal performance
Early detection involves regular visual inspections of the coolant reservoir and underbody panels.
Safety Precautions Before Starting the Repair
Working on Tesla's coolant system involves glycol-based fluid and proximity to high-voltage components. Always prioritize safety:
Park on a level surface and engage parking brake
Wear protective gloves, eye protection, and long sleeves to avoid coolant contact
Disconnect the 12V battery to prevent accidental pump activation
Allow the vehicle to cool completely if recently driven or charged
Have a drain pan ready, as coolant will spill during hose removal
Use only genuine Tesla G-48 coolant for refills to maintain system integrity
Never open the high-voltage battery coolant loops without proper tools, as air ingress can cause pump damage.
Tools and Parts Needed for the Replacement
A successful repair requires specific items for access and precision:
Socket set with extensions (10mm, 13mm common)
Torque wrench for accurate fastener reinstallation
Hose clamp pliers or vice grips for controlling coolant flow
Coolant catch container and absorbent mats
Trim removal tools for frunk liners and underbody shields
New supermanifold valve assembly or actuator kit (depending on exact failure)
Fresh O-rings and seals if performing partial repair
Vacuum fill tool or access to service mode for air purge
Preparation streamlines the process and minimizes downtime.
Step-by-Step Removal Process
Begin by raising the vehicle safely or working from the frunk area, depending on model access.
Remove the frunk liner and underbody aero shields for clear visibility
Locate the supermanifold, typically mounted forward of the penthouse
Drain coolant by activating service mode thermal fill/drain routine or manually releasing lower hoses
Clamp incoming and outgoing coolant lines to minimize spillage
Disconnect electrical harnesses from the valve actuator—note connector orientations
Release quick-connect fittings on coolant hoses; expect residual fluid
Unbolt the manifold bracket or valve mounting points carefully
Gently separate the faulty valve or full assembly, inspecting adjacent components for wear
Take photos at each stage for reference during reassembly.
Installing the New Valve
With the old part removed, transition to installation:
Clean mating surfaces thoroughly to ensure proper sealing
Apply compatible lubricant to new O-rings if supplied
Position the replacement valve, aligning ports precisely
Hand-tighten hoses before fully securing clips
Reattach mounting bolts to specified torque values
Reconnect electrical connectors, ensuring locks engage
Refill with approved coolant, monitoring for immediate leaks
Attention to alignment prevents cross-threading or pinched seals.
Bleeding and Testing the System
Air pockets are the enemy of efficient coolant flow, so proper purging is essential:
Enter service mode and run the thermal fill/drain cycle multiple times
Top off the reservoir to the proper level
Monitor for bubbles or level drops during operation
Test drive gently, observing temperature gauges and alerts
Scan for diagnostic codes using the vehicle's built-in tools
Recheck connections after initial heat cycles
A thorough bleed restores full thermal performance, from rapid supercharging to cabin comfort.
Common Mistakes to Avoid and Troubleshooting Tips
Even seasoned mechanics encounter pitfalls:
Skipping clamps leads to excessive coolant loss and mess
Improper torque can warp manifolds or cause future leaks
Mixing coolant types risks chemical reactions and corrosion
Forgetting to recalibrate the actuator may trigger persistent errors
Ignoring related components like pumps during inspection misses cascading issues
If leaks persist post-repair:
Pressure test the system for hidden cracks
Verify actuator movement electronically
Inspect downstream hoses for damage
Patience during testing pays off in long-term reliability.
This repair restores the intricate balance of Tesla's thermal architecture, keeping your vehicle performing at its electric best.
More from Tesla

How to fix FSD visualization lag after Tesla 2025.14 update
16.12.2025 07:02
How to replace Tesla Model 3/Y rear bumper clips (easy DIY)
16.12.2025 05:46
How to fix phantom drain overnight Tesla
16.12.2025 04:50
How to replace octopus coolant leak (Tesla Model 3 2017–2020)
16.12.2025 03:21
How to replace torn rear seat bolsters Tesla
16.12.2025 03:09