Tesla: How to replace coolant pump in battery pack
Tesla electric vehicles rely on a sophisticated thermal management system to keep the high-voltage battery pack at optimal temperatures. The coolant pump in the battery pack plays a critical role by circulating specialized coolant through channels integrated into the pack, dissipating heat during fast charging or high-performance driving and helping maintain efficiency in cold conditions. A failing pump can trigger warnings on the dashboard, reduce performance, or even lead to overheating issues if ignored. Replacing it restores proper cooling flow and prevents potential long-term damage to the battery cells.
While this procedure draws from common practices across models like the Model 3 and Model Y, slight variations exist depending on the specific configuration, such as single or dual motor setups with heat pumps. Always prioritize safety when working near high-voltage components.
Understanding the Battery Coolant System
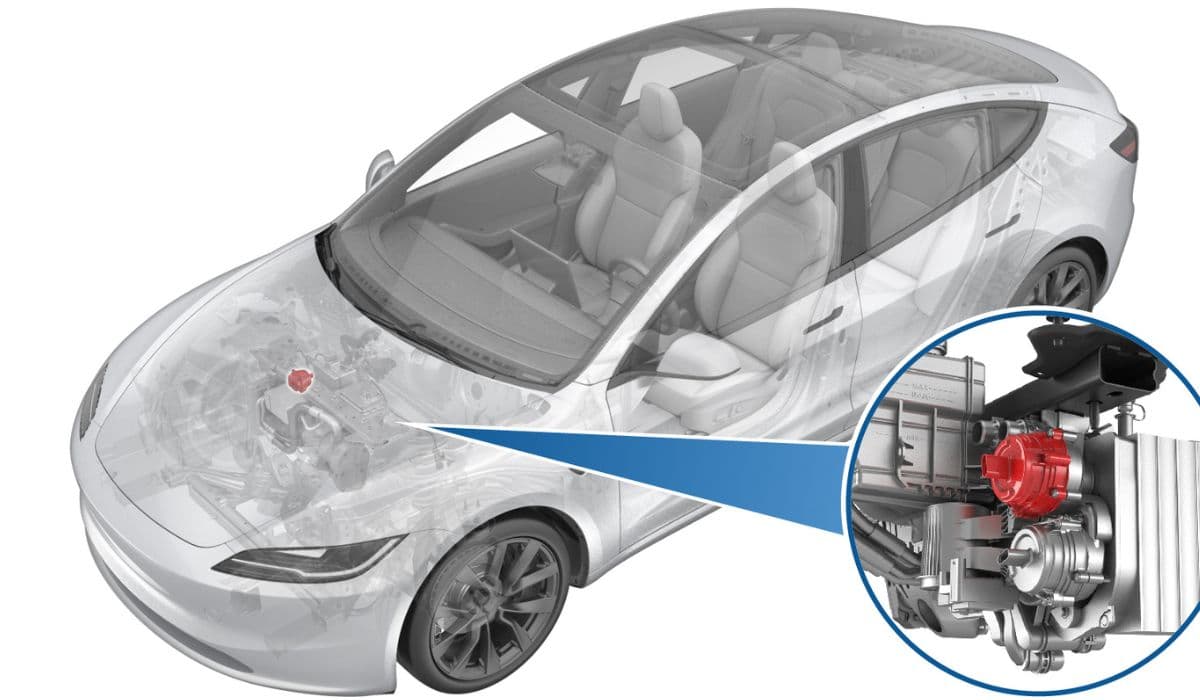
The high-voltage battery coolant loop is separate from other systems in most Tesla vehicles. It includes the pump, manifolds (often called the supermanifold or superbottle), hoses, O-rings, and sensors that monitor flow and temperature. The pump is typically an electric unit mounted directly to the manifold under the vehicle, accessible after removing protective panels.
Key functions include:
Circulating coolant to absorb heat from battery modules
Enabling preconditioning for optimal charging speeds
Integrating with the cabin heat pump in some models for efficiency
A malfunctioning pump might cause erratic temperature readings or reduced range in extreme weather, making timely replacement essential for vehicle longevity.
Signs of a Failing Coolant Pump
Owners often notice subtle indicators before a complete failure. Common symptoms include:
Dashboard alerts related to thermal system or power reduction
Unusual noises from under the vehicle, like whining during operation
Inconsistent battery temperature displayed in the app or touchscreen
Slower supercharging sessions due to thermal throttling
Coolant leaks visible under the front or mid-section of the car
Diagnosing involves entering service mode on the touchscreen to run thermal tests, where pump speeds can be monitored for irregularities.
Tools and Materials Needed
Preparation ensures a smooth process and minimizes risks. Essential items include:
Basic hand tools: sockets, torque wrench, pliers
Absorbent materials and a drain container for coolant spills
Silicone lubricant for O-rings
Replacement pump specific to your model (with new O-rings pre-installed or separate)
Protective gear: gloves, eye protection, and insulation mats for high-voltage safety
Work in a well-ventilated area and ensure the vehicle is fully powered down.
Safety Precautions Before Starting
High-voltage systems demand respect. Key steps to follow:
Park on a level surface and engage parking brake
Enter service mode and initiate any required thermal routines if accessible
Disconnect low-voltage power sources to isolate systems
Wait for high-voltage discharge (capacitors can hold charge)
Avoid contact with orange high-voltage cables
Have a fire extinguisher rated for electrical fires nearby
If unsure about any high-voltage procedure, consult professional assistance.
Step-by-Step Removal Process
Begin by elevating the vehicle safely on a lift or jacks for underbody access.
Remove the front aero shield panel to expose components
Position a drain container beneath the pump area to catch residual coolant
Release the electrical connector lock and carefully disconnect the harness (note orientation for reinstallation)
Remove the mounting bolts (typically four) securing the pump to the supermanifold
Gently pull the pump away, ensuring both O-rings (inner and outer) detach with the old unit
Inspect the manifold port for debris or old O-ring remnants and clean thoroughly
Expect some coolant drainage—handle it responsibly as it's specialized fluid.
Preparing the New Pump
A proper fit prevents leaks and ensures longevity.
Verify the replacement pump matches your vehicle's configuration
If O-rings are separate, install fresh ones (often color-coded, like purple inner and black outer)
Apply a thin layer of silicone lubricant to the O-rings for smooth sealing
Align any tabs or outlets correctly—often the connector should face upward or in a specific direction
This step is crucial for maintaining system integrity under pressure.
Installation Steps
Reassembly reverses removal with attention to details.
Position the new pump into the supermanifold, ensuring it's fully seated
Hand-tighten the bolts initially, starting with an upper one for alignment
Torque the bolts evenly in a cross pattern to specifications
Reconnect the electrical harness and secure the locking tab
Clean any spilled coolant from surrounding areas
Lower the vehicle temporarily if needed to check fitment.
Refilling and Bleeding the System
After hardware installation, restore fluid levels properly.
Reinstall protective panels like the aero shield
Use the touchscreen service mode to run coolant fill/drain or purge routines
Add approved coolant gradually while monitoring levels
Perform vacuum refill if available to remove air pockets
Run pump identification and purge cycles to verify operation
Check for leaks and monitor coolant level after test drives
Air in the system can cause pump cavitation or inaccurate readings, so thorough bleeding is vital.
Testing and Verification
Final checks confirm success.
Observe pump speeds in service mode diagnostics
Drive gently and monitor battery temperatures
Scan for any new alerts
Verify consistent charging performance and range
A properly functioning pump contributes to quieter operation and better overall efficiency.
This maintenance task, while involved, highlights the ingenuity of Tesla's integrated thermal design, keeping the battery pack performing at its best across varying conditions.
More from Tesla

How to fix HVAC blend door actuator clicking noise Tesla
16.12.2025 13:16
How to fix FSD visualization lag after Tesla 2025.14 update
16.12.2025 07:02
How to fix phantom drain overnight Tesla
16.12.2025 04:50
How to replace octopus coolant leak (Tesla Model 3 2017–2020)
16.12.2025 03:21
How to replace torn rear seat bolsters Tesla
16.12.2025 03:09